Quickstart Guide - Creating Sandboxes
In this guide, we’ll focus on creating a sandbox. The end-user's main goal is to solve their business need. To help illustrate this point, consider the following two scenarios:
- The end user is a software tester who wants to run validations on the latest build of their product. So this tester needs an environment that has the product of that particular build installed, along with any configurations and 3rd party software they might need, like a testing tool to be used for running the tests and some OS configurations that are needed to mimic a production environment.
- The end user is a sales representative who wants to demo their company's product to a potential client. So the sales rep needs an environment on which the product is installed with some mock data. The environment could comprise vCenter VMs on which the client and server are installed, connected to a DB server with mock data.
Target audience: Sandbox end users
Basic flow
Using CloudShell, setting up the test environment is simple:
- Browse the Blueprint Catalog.
- Reserve a blueprint.
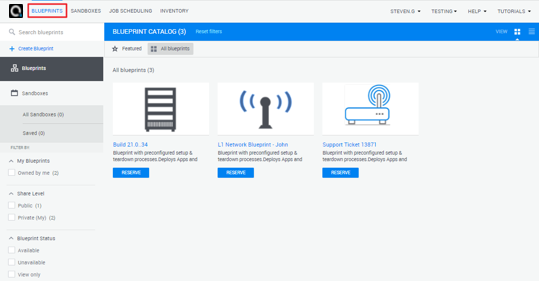
Browse the Blueprint Catalog
The Blueprint Catalog displays all your blueprints as well as any public blueprints in the current domain. This is where users browse for their desired blueprint and reserve it.
To open the Blueprint Catalog:
-
Log into CloudShell Portal and switch to the desired domain.
For example:

-
Click the Blueprints menu to display the self-service Blueprint Catalog.
Tip: To see only your blueprints, select the Owned by me filter on the left.
-
Browse the Blueprint Catalog.
-
Feel free to click a blueprint’s tile to look inside.
-
Look at the blueprint’s instructions. They should provide additional details about the blueprint and how to use it.
Reserve a blueprint
By reserving a blueprint, you create a live instance (or sandbox) of the blueprint’s environment. The reservation process allocates the ports that are involved in the resource connections and if they are defined as unshared, no one else can use them while the sandbox is active.
To reserve a blueprint:
-
In the Blueprint Catalog or workspace, click Reserve.

-
In the Reserve dialog box, you can optionally modify the reservation details.
For example, change the duration of the sandbox or schedule it to run in the future, or click the Advanced Form (
 ) to add permitted users so others can see and use the sandbox even if it’s private, and more.
 -
Click Reserve to start the sandbox.
The setup process should take a few minutes. During this time, CloudShell will provision the required resources, allocate the ports and create the connections between the resources. The sandbox’s state changes to Active, notifying you that it’s ready for use.
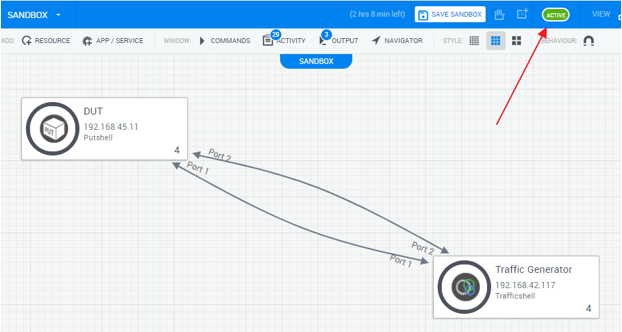
-
You can now use the sandbox. For example, connect to a device or application that was deployed in the sandbox, run commands by hovering over a resource and clicking the Commands button, check the Output console for sandbox messages and indications, and more.
Troubleshooting
Resources catalog
- If you can’t find the resources you are looking for in the Add Resource catalog, use the advanced search or expand the resource folders in the catalog. If you still can’t find the resources, check the Inventory dashboard as the resources may be excluded. If that’s the case, contact the administrator.
Reserve form
- When reserving the blueprint, the conflict resolution dialog box may be displayed if any of your resources or ports are currently being used in other sandboxes AND are defined as unshared. If this happens, the dialog box will propose alternative timeslots in which the blueprint’s resources are all available. If you’re the blueprint designer, you could replace one of the conflicting resources with an available one.
Setup process
- If the setup process encounters any errors, click the Activity button to review the reservation’s log for errors and consult the administrator.