Setting up Training Portal Using the Installer (Over the Shoulder)
Prerequisites
- NodeJS 14
- CloudShell 2020.1 GA or higher
- QualiX 3.2 or higher
Installation
To install and configure Training Portal:
-
Download and extract the Training Portal installation package from https://github.com/QualiSystemsLab/Training-Portal.
-
Set the Sandbox API endpoint by creating the following environment variable:
-
Variable name: QS_SANDBOX_API
-
Variable value: http://<Sandbox-API-IP>:<Sandbox-API-Port>
For example: http://192.32.4.122:82
-
-
In Command-Prompt, navigate to the root folder of the Training Portal and run:
npm installnpm run-script buildnode index.js
Customization options
-
Perform the desired customization:
-
White-labeling: Override the
\training-portal\src\assets\white-label-logo.pngimage file with the new logo (keep the same file name). -
Instructions pane width:
-
Open the
\training-portal\src\components\Instructions.jsfile. -
Locate the line:
export const instructionsDrawerWidth = '350px'; -
Set the desired instructions pane width, in pixels.
-
Save the file.
-
-
-
Rerun:
run-script buildtipIn some cases, like changing packages, you might need to re-run the
npm installas well. -
Restart the CloudShell Portal IIS service.
Configuration
-
In the Quali Server machine, open the following file in a text editor:
C:\ProgramData\QualiSystems\Settings\Global\ServerUniversalSettings.xml. -
Do the following under the
<ConfigurationSection name="LinkApplications">tag:-
Copy the appropriate Full link(s):
importantMake sure to use these links and not the ones in Configure Remote Access to Sandbox Components Using SSH, RDP, Telnet, VNC (QualiX).
SSH Full link:
<key name="SSH - Full" pattern="http://<QualiX IP>/remote/#/client/c/ssh{qid}?qtoken={qtoken}&hostname={Address}&protocol=ssh&port=22&username={User}&password={Password}" icon-key="SSH" />RDP Full link:
<key name="RDP - Full" pattern="http://<QualiX IP>/remote/#/client/c/rdp{qid}?qtoken={qtoken}&hostname={Address}&protocol=rdp&port=3389&username={User}&password={Password}&security=any&ignore-cert=true" icon-key="RDP" /> -
Copy the appropriate Read only or Full access link from the sections below:
Read only links
In "read only" mode, the user can only view the session but not move elements or click buttons and links on the connected device.
<key name="SSH - ReadOnly" pattern="http://<Qualix IP>/remote/#/client/c/ssh{qid}sharedr?qtoken={qtoken}&hostname={Address}&protocol=ssh&port=22&username={User}&password={Password}&shared=true&readonly=true" icon-key="SSH" /><key name="RDP - ReadOnly" pattern="http://<Qualix IP>/remote/#/client/c/rdp{qid}sharedr?qtoken={qtoken}&hostname={Address}&protocol=rdp&port=3389&username={User}&password={Password}&security=any&ignore-cert=true&shared=true&readonly=true" icon-key="RDP" />Read/Write access links
A full access connection grants the user full permissions on the device or VM's OS. However, since this is a shared link, it can only access existing connections but not create them.
<key name="SSH - ReadWrite" pattern="http://<Qualix IP>/remote/#/client/c/ssh{qid}shared?qtoken={qtoken}&hostname={Address}&protocol=ssh&port=22&username={User}&password={Password}&shared=true&readonly=false" icon-key="SSH" /><key name="RDP - ReadWrite" pattern="http://<Qualix IP>/remote/#/client/c/rdp{qid}shared?qtoken={qtoken}&hostname={Address}&protocol=rdp&port=3389&username={User}&password={Password}&security=any&ignore-cert=true&shared=true&readonly=false" icon-key="RDP"/> -
In each link, replace
<QualiX IP>with the QualiX Server hostname or IP address.
-
-
Save the file.
-
Restart the Quali Server service.
-
In Resource Manager Client, create a user for the trainee with access to the appropriate domain.
Setting up a new training session
-
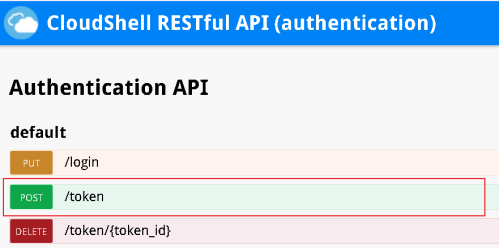
In REST API, create an access token for the training session:
-
Open the Training Portal's live documentation page:
http://\[CloudShellPortalAddress\]:82/api/explore/#/ -
Log in to the user's domain.
-
Expand the POST /token API method.
-
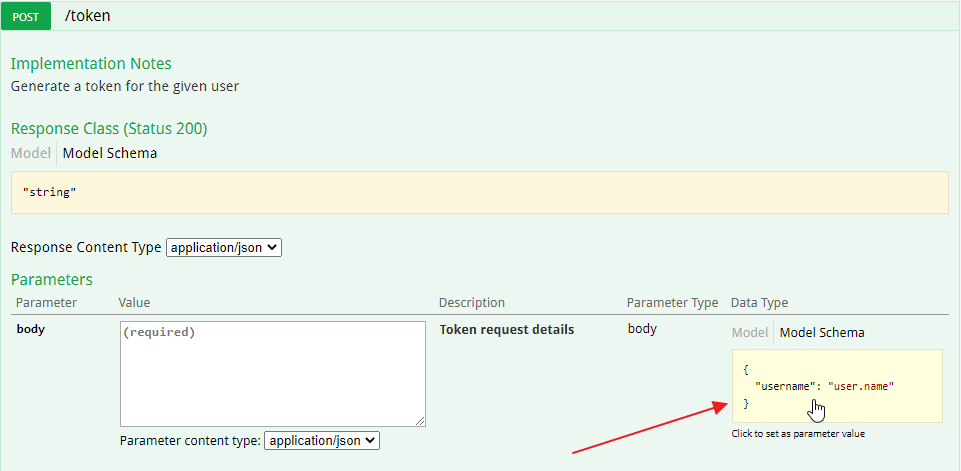
Click inside the Model Schema area to load the request body.
-
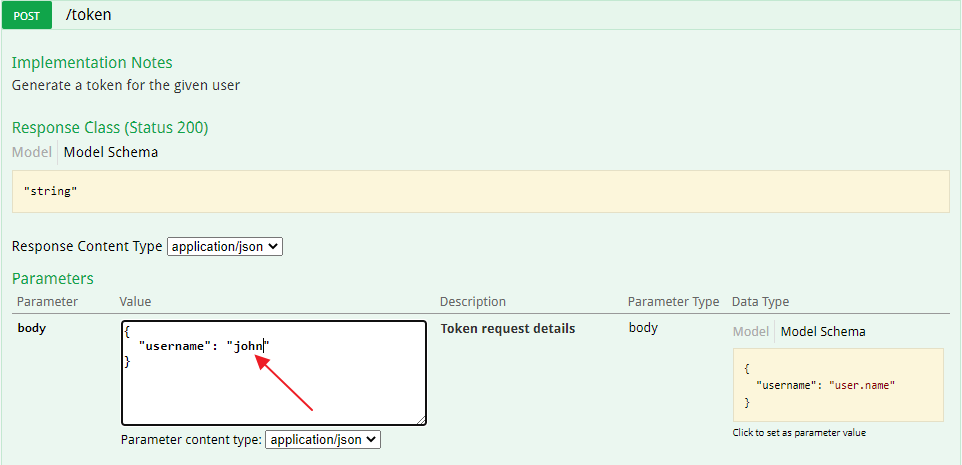
In the body area, replace user.name with the trainee's CloudShell user name (do not remove the quotes).
For example:
-
Click Try it out!.
A Response Code of "200" indicates success.
-
Copy the access token from the Response Body, without the quotes.
-
-
Build the training portal link:
http://<TrainingPortaUrl>:3001/<SandboxId>?access=<AccessToken>Where:
- <TrainingPortalUrl> is the url defined in the
package.json("3001" is the default Training Portal port) - <SandboxId> is the sandbox ID (taken from the sandbox's URL)
- <AccessToken> is the access token you copied from the POST /token API's Response Body
For example:
http://112.78.85.27:3001/645b57f6-9ea3-4968-aa92-900bf3ee5be8?access=NEapY8Cnqk6JYPNAt7il5w2Tips- By default, when starting the Training Portal with the
node index.jscommand, it will start listening on port 3001. This is a value that is coming from inside theindex.jsfile. If you prefer a different port, you should edit the file. - Use a tool like pm2 to make the process run as a service (https://pm2.keymetrics.io/).
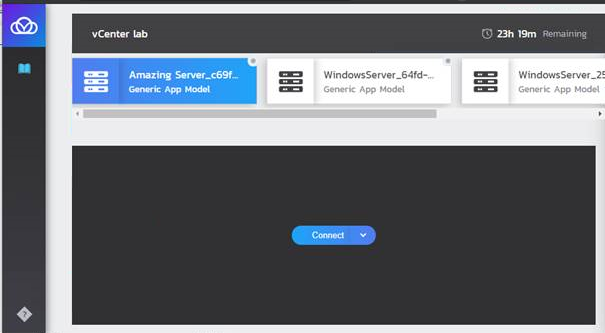
The trainee uses this link to work in the sandbox, which looks something like this:
Over-the-shoulder users access the trainee's QualiX session from the sandbox, via the resource or App's remote access links.
- <TrainingPortalUrl> is the url defined in the
HTTPS Configuration
-
Prepare the Certificate Files:
- Obtain or generate the server certificate key and PEM files.
- Copy the files to the Training Portal server.
-
Ensure you have the full path to the PEM and key files.
-
Stop the Training Portal server.
-
Open a command prompt window.
-
Run the appropriate commands to create the necessary environment variables:
-
For Windows:
set PROTOCOL=https
set SSL_CRT_FILE=C:\qs\Training-Portal\cert\server.pem
set SSL_KEY_FILE=C:\qs\Training-Portal\cert\server.keywarningMake sure to replace the path and name with the actual full path and name to the certificate files on your system.
-
For Linux:
export PROTOCOL=https
export SSLCRTFILE=./server.pem
export SSLKEYFILE=./server.key
-
-
Start the Training Portal server.
-
Run
node index.js