Set up AlwaysOn Availability Groups (Only for AlwaysOn Users)
Make sure to perform the steps in the Configure Quali Server on the First Cluster Node topic in order to work with the Availability group listener step after configuring the AlwaysOn availability group.
To cluster the database:
-
Ensure that you create a full back up for all clustered CloudShell databases. For more information, see (https://msdn.microsoft.com/en-us/library/ms187510.aspx).
-
Make sure to open port 5022 on all cluster machines firewalls
-
Open the SQL server in which you created the CloudShell DBs, expand AlwaysOn High Availability and right-click Availability Groups.
-
Click New Availability Group Wizard.

-
Specify a group name.
-
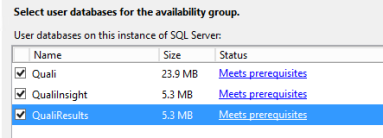
Associate the availability groups to the CloudShell databases (Quali Database, Results Database, Insight Database).
- For SQL Server Enterprise Edition, associate all three databases to the availability group.
- For SQL Server 2016 Standard Edition, create two additional AlwaysOn availability groups by repeating steps 4-5 (3 groups in total), and associate each database to a different group.
-
Make sure that status in the Status column of every database is Meets prerequisites. If not, click the database status, follow the error message and resolve the issue.

-
Click Next.
-
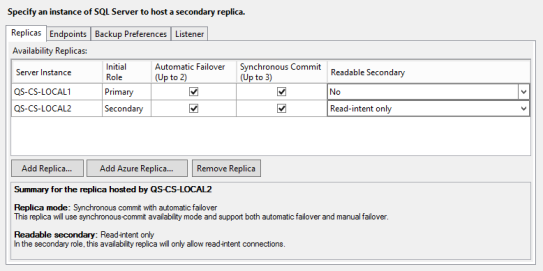
Under the Replicas tab, click Add Replicas and connect to all of the environment SQL nodes using SQL or windows authentication.

-
Select the Automatic Failover checkbox for each of the servers and for each of the servers, select Read-intent only from the Readable Secondary dropdown list.
noteSQL Server 2016 Standard Edition does not support this feature.
-
Click the Listener tab, insert the values for Listener DNS Name, Port (1433 for MSSQL default) and select Network Mode. If you selected DHCP, then select subnet. If you selected Static IP, then specify an available IP in the subnet.
noteIn SQL Server 2016 Standard Edition, set a different port number for each availability group's listener (3 in total).
-
Click Next.
-
Select Full. Specify the database backup file location on the server and click Next.
-
Wait for the validation step to finish.
-
If an error occurs during this process, click on the error, resolve the problem and run the validation step again.
-
When all steps are free of errors, click Next.
-
Click Finished. The wizard is finalized and the clustering Role dependencies are created.
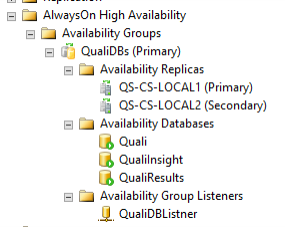
Now, the availability group is set up, and you can see all relevant data for it under the availability group name you specified in early step:
