Configuring Single Sign-On (SSO)
In this article:
SSO Overview
SSO/SLO configuration is available with CloudShell Premium Tier.
Single sign-on is an access control and authentication method that enables you to access several services through a single login page, prompting you to enter you credentials only once. You can use SSO to enable your users to access CloudShell through your homepage.
Single sign on to the CloudShell Portal is done using the SAML protocol. This configuration relies on a third-party identity provider (IdP) for authentication and authorization, using Security Assertion Markup Language (SAML).
SAML SSO for CloudShell is implemented through Saml2 (previously known as Kentor AuthServices), an open-source library that adds SAML2 support to ASP.NET and IIS websites, integrating with various identity providers.
Configuring SAML Single Sign-On (SSO)
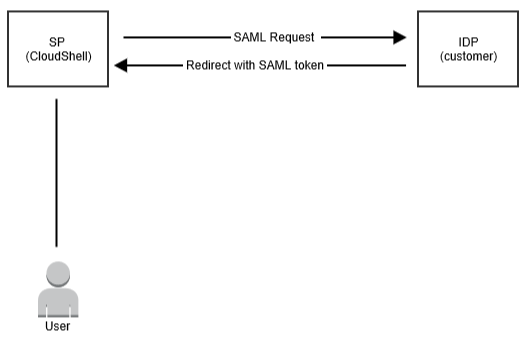
You can configure Security Assertion Markup Language (SAML) single sign-on (SSO) to allow secure web domains to exchange user authentication and authorization data (such as username and password). Using SAML, an online Service Provider (SP) can contact a separate online Identity Provider (IdP) to authenticate users who are trying to access secure content.
The following figure shows the typical use case addressed by SAML, where the principal (user) requests a service from the Service Provider. The Service Provider requests and obtains an identity assertion from the Identity Provider. On the basis of this assertion, the Service Provider can make an access control decision, in other words it can decide whether to perform some service for the connected principal (user).
Note: CloudShell supports SAML v2.0. If you encounter an error, please contact your SAML administrator.
To configure SAML SSO for CloudShell Portal:
- Set up an Identity Provider (IdP).
Note: When setting up and managing the Identity provider, make sure to configure the IdP to recognize CloudShell Portal as a service provider.
- Install a certificate on a local machine.
- Configure CloudShell to work with SAML SSO.
Set up an Identity Provider (IdP)
When setting up an Identity Provider, make sure you do the following:
-
Configure a SAML 2.0 app with the required users.
Notes: When creating users in the IdP, the users must have the following attributes in order to be authenticated (see the kentor.config example to see how they are used):userName: with the user name;emailAddress: with the email address;timezoneName: with the values from the Time zone name column in MSDN's Time Zone IDsRelayState: with the URL of the location to be directed to after sign-on(Optional)
Domain: with the CloudShell domain name to log the user into (if the user's group is associated with more than one domain). To change the name of theDomainattribute, see SAML Single Sign On (SSO).- When a user logs into CloudShell for the first time or if the specified CloudShell domain does not exist, they will be logged in randomly to one of the domains they can access.
- The user will be logged into the domain they were last logged into if either the user does not have permission to access this domain, or no domain attribute was created in the IdP for that user.
- Plus any other attributes according to which users should be mapped into groups in the sso_group_rules.config.json file
-
In the ACS URL field, add the following URL:
http://[server]/AuthServices/ACS[Server]should be replaced with the address or name of the machine on which the CloudShell Portal client is installed. To see a sample configuration using Okta, click here...
- Log in to your Okta organization as a user with administrative privileges. If you don’t have an Okta organization, you can create a free Okta Developer Edition organization.
-
Click Admin.
 .
. -
Click the Add Applications shortcut.
 .
. -
Click Create New App.
 .
. -
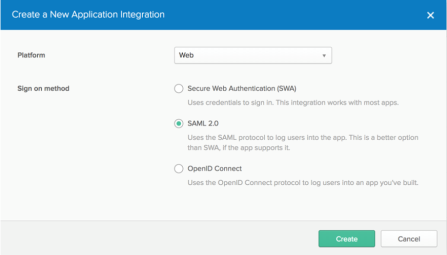
In the dialog that opens, select the SAML 2.0 option, then click Create.
-
In step 1 - General Settings, enter Example SAML Application in the App name field, then click Next.

-
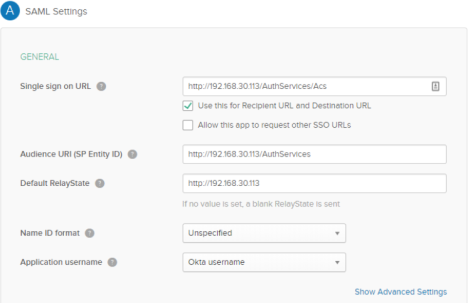
In step 2 - Configure SAML, section A SAML Settings, paste the logout page URL in the Single sign on URL and Audience URI (SP Entity ID) fields.
-
In the Attribute Statements section, add the following two attribute statements:
- emailAddress: user.email
-
userName: user.login

- Click Next.
-
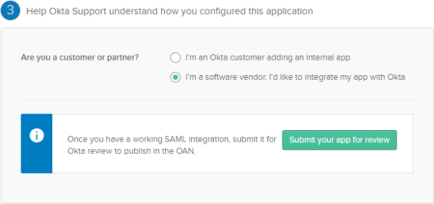
In step 3 - Feedback, select I'm a software vendor. I'd like to integrate my app with Okta then click Finish.
-
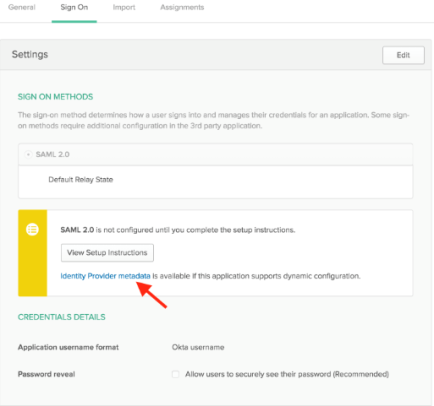
The Sign On section of your newly created “Example SAML Application” application is displayed. Right-click the Identity Provider metadata link, select copy and save it somewhere you'll remember.
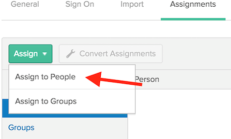
- Right-click the Assignments section of the “Example SAML Application” application and select Open Link In New Tab (so that you can come back to the “Sign On” section later).
-
In the new tab that opens, click Assign button and select Assign to People.
-
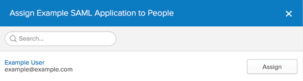
In the Assign Example SAML Application to People dialog box, type your username into the search box and click the Assign button next to your username.
-
Verify your user's attributes and select Save and Go Back.
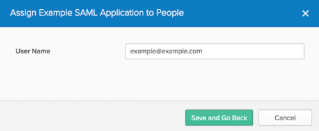
- Click Done.
- Download the X.509 Certificate acquired from the IdP. Make sure the file type is .cer.
- Copy the Identity Provider Single Sign-On URL and save it for later.
- Copy the Issuer URL and save it for later.
Install a certificate on a local machine
While setting-up an IdP, you are required to download a certificate file used for communication with the IdP. For increased security, install certificates on your local machine.
To install a certificate:
- After downloading the .cer file to your local directory, double-click to open it.
- In the Security Warning window, click Open.
- In the Certificates window, click Install Certificate.
The Certificates Import Wizard displays.
- In the Store Location section, select Local Machine and click Next.
- Select the certificate store in which you want to install your certificate, and click Next.
- Click Finish to import the certificate.
Configure CloudShell to work with SAML SSO
Configuration includes defining user groups and enabling the use of SAML SSO in CloudShell.
Users created in the IdP can use their defined User Name and Email attributes to log in to CloudShell Portal. If they are not pre-existing CloudShell users, they are automatically mapped to a group in CloudShell, according to the group rules defined in a dedicated sso_group_rules.config.json file.
Notes: By default, users that are added to CloudShell via SSO are also added to the External Users group. However, you can change this via the Registration.AdditionalGroup configuration key.
For information about creating users, see Managing CloudShell Users.
To define user groups for SAML SSO:
- Make sure the required user groups already exist in CloudShell and are added to a domain.
- Create a JSON file with the groups and their constraints per your needs, and save it under the name sso_group_rules.config.json in the root folder of the CloudShell Portal installation directory.
- Alternatively, you can download the sample JSON file and use it as a template for the construction of a static predefined group.
Points to consider:
- Users are associated to a group if their attributes match all the constraints defined for that group. Users can be associated to more than one group.
- By default, group associations are created when registering the user. However, admins can set CloudShell to update the group associations whenever the user logs into CloudShell. For details, see Enabling CloudShell to auto-update group associations on user login.
- Optionally, you can use regular expressions in the sso_group_rules.config.json file you created to define dynamic groups that are conditioned by the values of the SAML parameters. Once regular expressions are enabled, with the
EnableRegexelement, the constraints' values are recognized as regular expressions.
Notes for setting up SSO login to a CloudShell API:- If you're setting up SSO login to a CloudShell API, place the file under the Server installation directory (usually at C:\Program Files (x86)\QualiSystems\CloudShell\Server\).
- Users are created according to the email and preferred_username claim. If there is no preferred_username, the username will be the email.
Example: A group defined using regular expressions:
{
   "Groups":[
      {
         "EnableRegex":true,
         "GroupName":"{group_name}",
         "Constraints":[
            {
               "Attribute":"TargetGroup",
               "Value":"^(?<group_name>.*)$"
            }
            {
               "Attribute":"Location",
               "Value":"*"
            }
         ]
      }
   ]

}
Example: Adding all new SSO users to a specific group:
The attribute you use is an attribute that comes back from the IdP, so it doesn't matter which one you choose. If the value is set to *, it will match any user and assign them to the NewUsers group.
{ "Groups":[ { "GroupName":"NewUsers", "Constraints":[ { "Attribute":"userName", "Value":"*" } ] } ] }Note: The asterisk in
Value="*"is recognized as a regular expression, even if regular expressions are not enabled. - Save your JSON file under the name sso_group_rules.config.json (make sure the name is an exact match).
To enable SAML SSO:
-
Go to the C:\Program Files (x86)\QualiSystems\CloudShell\Server\customer.config file, and add the following key:
<add key="Authentication.ExternalLoginMode" value="Header" /> -
Go to the C:\Program Files (x86)\QualiSystems\CloudShell\Portal\customer.config file, add the following keys and set the required values:
<add key="CustomAbsoluteLoginPage" value="http://[server]/AuthServices/SignIn"/>(Used to redirect the user to a specified URL whenever the user browses the CloudShell Portal's login page. The [Server] should be replaced with the address or name of the machine on which the CloudShell Portal client is installed.)<add key="CustomAbsoluteLogoutPage" value="http://[server]/AuthServices/Logout"/>([server] is the IdP server's IP or DNS (for some IdPs, you may need to specify the CloudShell Portal instead). Used to redirect users after logging out of CloudShell Portal.)
- Add the kentor.config file, based on our sample file, to the C:\Program Files (x86)\QualiSystems\CloudShell\Portal folder.
- The sample file shows only the minimum requirements.
- You may also save the certificate file and use the key
<signingCertificate fileName="~/App_Data/Kentor.AuthServices.StubIdp.cer" />with your certificate file path. -
Edit the file according to the additional information required by your IdP.
For more details on the file and its elements, see the Saml2 Configuration documentation.
- Restart Quali Server and CloudShell Portal IIS services.
- Open your browser and navigate to your portal.
You are redirected to the IdP’s login page instead of CloudShell Portal.
Note: When trying to access the login page, if you receive a "Missing BASE64 Value" error message, make sure you have configured all the required application details correctly in the IdP.
- Enter the user name and password you gave the user via the IdP, and you will be referred directly to the Portal's home.
The kentor.config file contains all the Authentication requirements, for example, the location of the certificate store and requested attributes for the IdP response.
Sample file requirements
| Requirement | Description |
|---|---|
| <kentor.authServices> | |
| entityId |
The name the service provider will use for itself when sending messages. In this case, it is the CloudShell Portal location on your local machine with the addition of /AuthServices. |
| returnUrl |
The URL that you want users to be redirected to once the authentication is complete. This is typically the start page of the application, or a special signed in start page. |
| <metadata> | |
| requestedAttributes |
List of attributes to be included in the assertions generated by the identity provider. The requestedAttributes section SHOULD NEVER be changed. |
| <identityProviders> | |
| entityId |
The name that the IdP will use for itself when sending responses. Here you must enter the Issuer URL you retrieved from the IdP. |
| signOnUrl | The URL to the sign-in page of the IdP, to which CloudShell Portal will redirect users in order to sign in. |
| allowUnsolicitedAuthnResponse | This enables the IdP to initiate sign on where there was no prior authentication request. |
| binding | The binding that the services provider should use when sending requests to the identity provider. |
|
<signingCertificate>
|
|
| storeLocation | The location of the certificate store to search for the certificate you installed. |
| storeName |
Name of the certificate store to search for the certificate. Note: If you stored the certificate in the Personal store, enter "My" as value. For more information see MSDN's StoreName Enumeration page. |
| findValue | A search term to use to find the certificate. The value will be searched for in the field specified by the x509FindType attribute. The required information can be found in the installed certificate details in the certificate store. |
| x509FindType | The field according to which the certificate will be searched, as defined by the value in the findValue attribute. You can find more information about this in MSDN's X509FindType Enumeration page. |
Tip: You can use the SSO Tester utility to test your SSO configuration. For additional information, see SSO Tester.
Enabling CloudShell to auto-update group associations on user login
By default, group associations are created when registering the user. However, by enabling the ReevaluateSSOUserAssociationUponLogin configuration key, CloudShell will update the group associations whenever the user logs into CloudShell.
To enable group associations on login:
-
Go to the C:\Program Files (x86)\QualiSystems\CloudShell\Server\customer.config
file, and add the following key:
<add key="ReevaluateSSOUserAssociationUponLogin" value="true"/> -
Restart the CloudShell Server service.
Enabling direct access to CloudShell Portal
Users with CloudShell credentials can access CloudShell Portal directly, not via the SSO login page. By default this is disabled.
To enable direct access to CloudShell Portal:
-
Go to the C:\Program Files (x86)\QualiSystems\CloudShell\Portal\customer.config
file, and add the following key:
<add key="BypassCustomLogin" value="true"/> -
Restart the CloudShell Portal IIS service.
- Log in to CloudShell Portal using this URL format: https://<CloudShell Portal>/Account/Login?nocustom=nocustom.
For example: "https://192.173.45.80/Account/Login?nocustom=nocustom"
You are directed to the CloudShell Portal login page
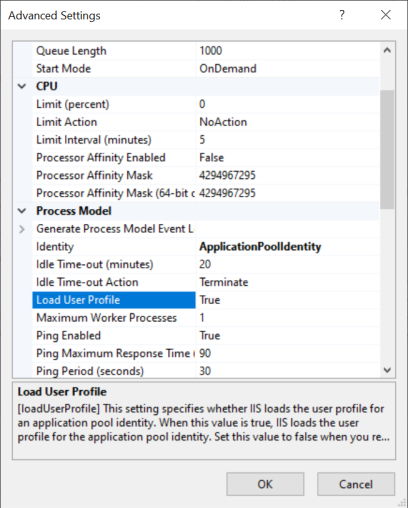
-
If you encounter an error, in IIS Manager, in the Advanced Settings window of the CloudShell Portal site's application pool, set Load User Profile to True.
Disabling SSO
To disable SSO:
- Go to the C:\Program Files (x86)\QualiSystems\CloudShell\Portal\customer.config file, and take out the following key:
<add key="CustomAbsoluteLoginPage" value="http://[server]/AuthServices/SignIn"/> - Restart the CloudShell Portal IIS service.
