Managing CloudShell Users
The following user management options are performed in the Users tab in the Resource Manager. To access the Users tab, in the Admin ribbon, click the Users button.
In this article:
Adding new users manually
To add a new user manually:
- Log in to Resource Manager Client as administrator.
- In the Admin ribbon, click Users.
- Click New. The New User dialog box is displayed.
-
Fill in the settings:
- Username
- Password
-
Email: user's email that will receive email notifications and messages from other users regarding sandboxes.
Notes:- The user can change their email in CloudShell Portal.
- To enable email notifications, SMTP mail configuration is required.
-
Administrator: Select to grant the user System Administrator permissions.
System administrators are the most privileged users in CloudShell. They can access and modify all assets in their domain(s), including private blueprints, create inventory resources and Apps, perform administrative tasks in CloudShell, like managing users, groups and domains, modifying resource families and models, creating and configuring resources in Resource Manager Client, and viewing CloudShell activity logs and utilization reports. Other, less privileged user types are defined by their group's role - see Managing CloudShell Groups.
- Active: Clear to add the user as an inactive user. This will prevent the user from accessing and using CloudShell but keep the user profile in the system.
- Reservation Duration limit: Select the maximum allowed sandbox duration for the user. The default is 1 day, which can be changed using the
DefaultUserMaxReservationDurationconfiguration key. -
Max Concurrent Reservations: Set the maximum number of sandboxes the user can own at any time.
The default is 10 scheduled sandboxes for new users, which can be changed using the
DefaultUserMaxConcurrentReservationsconfiguration key. -
Max Scheduled Sandboxes: Set the maximum number of scheduled (planned/future) sandboxes the user can have at any time.
By default, new users are allowed to have up to 10 scheduled sandboxes while users migrated from a pre-9.3 Patch 2 CloudShell version (via upgrade) have an empty value (unlimited). Value "0" means the user can only start immediate reservations (no scheduled). Admins can change the default using the
DefaultUserMaxScheduledSandboxesconfiguration key. - Max Owned Blueprints: (Applies to admins, domain admins and regular users only) Set the maximum of blueprints the user can own at any given time. Unlimited by default.
-
Max Saved Sandboxes: (Applies to customers using the Save and Restore add-on) Set the maximum number of saved sandboxes the user can have at any time.
This overrides the default, which is unlimited, and can be changed using the
DefaultUserMaxSavedSandboxesconfiguration key.
- Click OK.
Importing users into CloudShell from an active directory
The following procedures explain how to import users from your active directory into CloudShell. To enable user import, the ActiveDirectory.Domain configuration key needs to be set - see Configuring CloudShell to import user definitions from an active directory.
Once imported and associated to the relevant CloudShell groups and domains, imported users log into CloudShell using their active directory username and password, and the desired CloudShell domain. In addition, the password of an imported user can only be changed from the active directory itself.
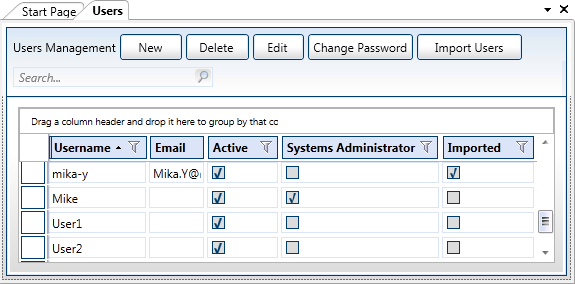
In Resource Manager Client, in the Users tab, imported users have the Imported check box selected (illustrated for user "Mika-y" in the image below).
Importing users from an active directory group
To import users from a specific active directory group:
- Log in to Resource Manager Client as administrator.
- In the Admin ribbon, click Users.
- Click the Import Users button.
- In the Import Users dialog box, select the Group option.
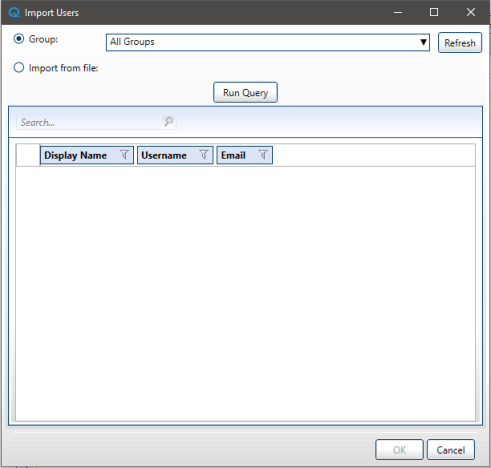
- Click Refresh to get a full list of groups that exist in the current domain.
- Select the required group from the Group drop down list or leave All Groups to get all users in the active directory.
- Click Run Query to get the list of users.
-
Select the users to import. Press the [CTRL]+[A] keys to select all users in the list or press the [CTRL] key to select specific users.
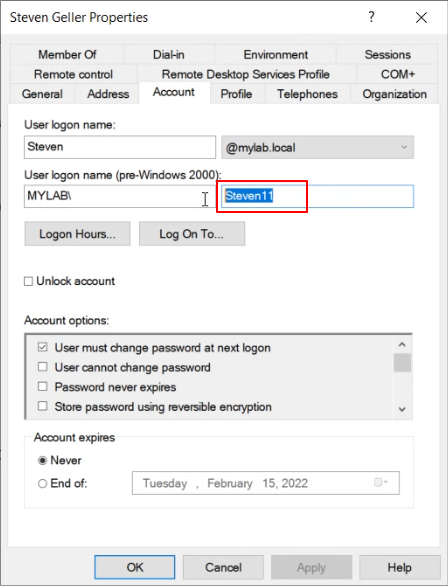
Active Directory users are added as follows:- AD First Name field maps to the CloudShell Username (in user list and auto-import dialog)
- AD Display Name field maps to the CloudShell Display Name (in auto-import dialog)
-
AD Pre-win2000 field (SamAccountName) maps to Cloudshell Username. Click
 more...
- Click OK.
Importing active directory users from a file
You can also import users from an external text file. The file must contain a list of valid email addresses in the active directory, separated with a comma or semicolon.
To import users from a file:
- Log in to Resource Manager Client as administrator.
- In the Admin ribbon, click Users.
- Click the Import Users button.
-
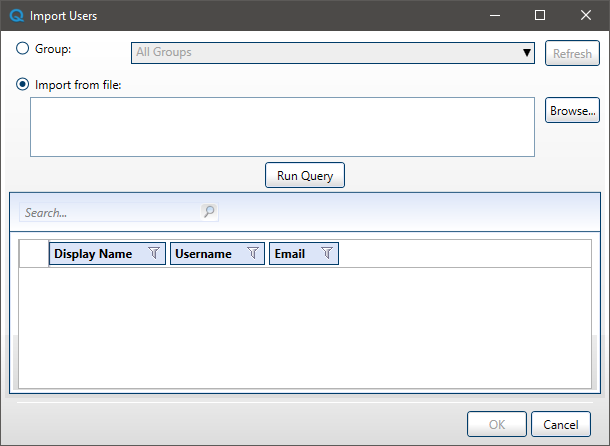
In the Import Users dialog box, select the Import from file option.
-
Click Browse and select the txt file. The email addresses must be comma or semicolon-separated. For example: jane.d@company.com,john.j@company.com,steve.b@company.com,deb.h@company.com
The file contents are displayed in the text box.
-
Click the Run Query button to get the list of users from the loaded file.
The users are listed in the dialog box. Nonexistent users in the file are not listed.
- Select the users to import: Press the [CTRL]+[A] keys to select all users in the list or press the [CTRL] key to select specific users.
-
Click OK.
The users are added to the Users Management list from the current domain.
Enabling CloudShell to automatically import Active Directory users when they first log in
For additional information, see Configuring CloudShell to automatically import users from an external system at login.
Updating user settings
This section explains how to edit a user's settings. The user's name cannot be edited. To edit a user's password, see Changing a user's password.
To edit a user's settings:
- Log in to Resource Manager Client as administrator.
- In the Admin ribbon, click Users.
- Select a user from the list and click Edit.
- If this user was imported from an Active Directory of a Windows Domain, the Imported check box is selected and the Email field is disabled.
- The Edit User window also displays all of the user's group memberships.
- Perform the required changes and click OK.
Changing a user's password
Imported user passwords are managed from the active directory itself.
To change a user's password:
- Log in to Resource Manager Client as administrator.
- In the Admin ribbon, click Users.
- Select a user from the list and click Change Password .
- Enter the new password in the Password and Confirm fields.
- Click OK.
Deleting users
Before deleting a user, you must either deactivate the user (by unselecting the Active check box in the user's profile) or delete all sandboxes (current, historic, future) that are associated with this user.
Note: To see a user's associated sandboxes, open the Sandboxes dashboard in CloudShell Portal, preferably in the Global domain, select the correct time range and then filter the sandboxes by entering the username in the Search sandboxes field.
Important: Deleting the sandboxes affects BI data (such as resource utilization and blueprint consumption), while deactivating the user keeps the BI data consistent.
To delete an existing user:
- Log in to Resource Manager Client as administrator.
- In the Admin ribbon, click Users.
- Select the user that you wish to remove from the list and click Delete. To select multiple users, press the [CTRL] key and select the users.
