Services in Blueprints
This article explains how to use services in blueprints. For additional information about CloudShell services, see Services Overview.
View services
To view services:
-
In the Diagram view, in the toolbar, click App / Service.
The Add App / Service catalog is displayed. -
Browse the catalog by selecting a services folder or by using the text search.
The list of folder items are displayed, grouped by the service families.

Add services
Before you add a Subnet service, read through Subnet Connectivity - Points to Consider.
To add a service to the diagram:
-
Click the ‘+’ icon or drag it from the catalog into the diagram.

The Add Service dialog box is displayed.
-
Fill in any required fields.
-
Click Add.
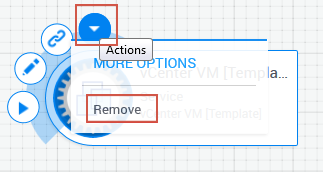
Remove services
To remove a service from the diagram:
-
Select the required service.
-
Hover over the Actions menu, select More Options and then select the Remove option .
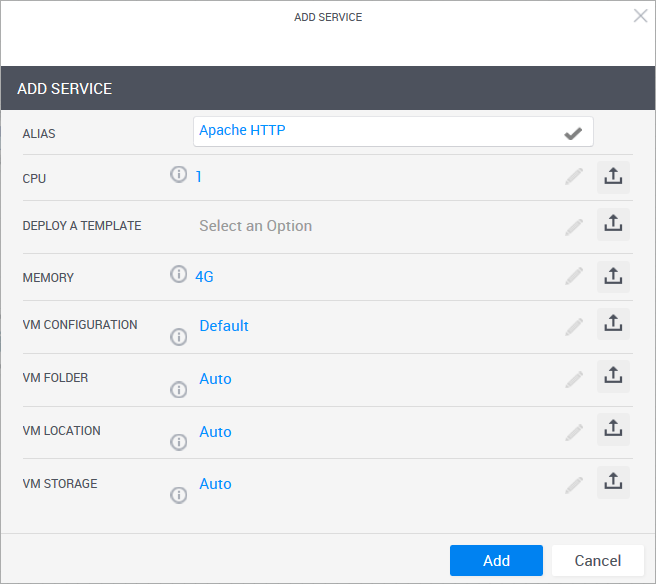
Specify service attributes
When adding a service to a blueprint, you can specify that certain service attributes must prompt the user to enter values when the blueprint is reserved.
To specify service attributes in a blueprint:
- Login in to CloudShell Portal as administrator.
- Click Lab Management > Blueprints
- Click + Create Blueprint. If the Select from Templates context menu is displayed, click Create Empty Blueprint.
A new blank blueprint is displayed in the Blueprint Catalog.
-
In the toolbar, click App / Service.
The Add App / Service pane is displayed.
-
Drag the required service into the blueprint canvas. For the purposes of this procedure, a service called Apache HTTP is added.
The Add Service dialog box is displayed.
-
To make an attribute available as a required data-entry field to users of the blueprint, click the publish icon:
 note
noteIf you need to modify the attribute so that it is no longer published, click the publish icon again.
-
To add the service to the blueprint, click Add.