Select the CloudShell Components to Install
Depending on the installation type you selected, you will be prompted to select the CloudShell components to install.
The installation types are:
- Custom Component selection
- Client Component selection
- Server Component selection
- Standalone Component selection
Standalone does not install the License Server component. We recommend selecting Custom and choosing the specific CloudShell components you wish to install.
Custom Component selection
-
In the Component selection window, select the components to install.
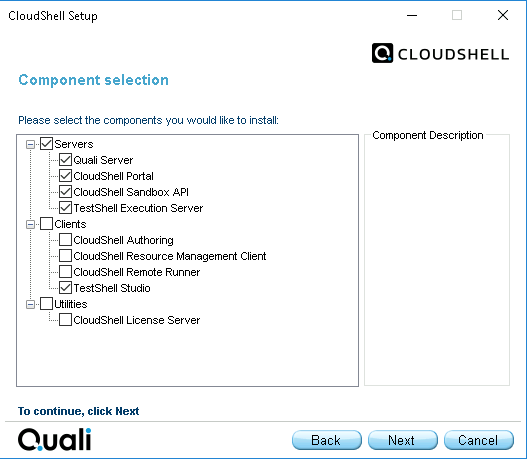
The available components are listed in the following table.
Component Description Quali Server Quali Server is the central application responsible for running the CloudShell framework and managing the CloudShell data. CloudShell Portal CloudShell Portal is a self-service web client that enables you to manage your data center, create and manage blueprints and sandboxes, as well as manage and schedule your automated testing.
You can leverage CloudShell's extensive automation capabilities to run blueprint and resource commands as well as automate business use cases within sandboxes.CloudShell Sandbox API Sandbox API allows you to automate the deployment and consumption of CloudShell sandboxes and can be integrated with different software interfaces, such as Jenkins and TeamCity, for example, to develop and automate Continuous Integration/DevOps processes.
Note: You can install the CloudShell Sandbox API service either on the same machine on which CloudShell Portal/Quali Server is installed, or on a different machine, and you can install several instances of this service on several machines. For configuration details, see Configure CloudShell Sandbox API.TestShell Execution Server Execution Server runs TestShell tests and automation commands in CloudShell sandboxes and sandbox elements. Clients CloudShell Authoring The Authoring desktop application provides a code-free hardware interface editor for quick driver development for any blueprint, supporting full equipment interchangeability for easy collaboration. CloudShell Resource Management Client The Resource Manager Client desktop application provides GUI based resource modeling and lab management capabilities [Admin only]. CloudShell Remote Runner The Remote Runner desktop application executes CloudShell specific automation steps or completes scenarios on remote stations, enabling the execution of any script or protocol on a remote machine without requiring complex infrastructure. TestShell Studio The Studio desktop application provides GUI based test authoring and execution. Utilities CloudShell License Server License Server manages network license distribution. License Server can be installed on any CloudShell machine, and should be installed before client installations. -
Click Next to proceed to Select the Database Type.
Client Component selection
-
In the Component selection window, select the components to install.
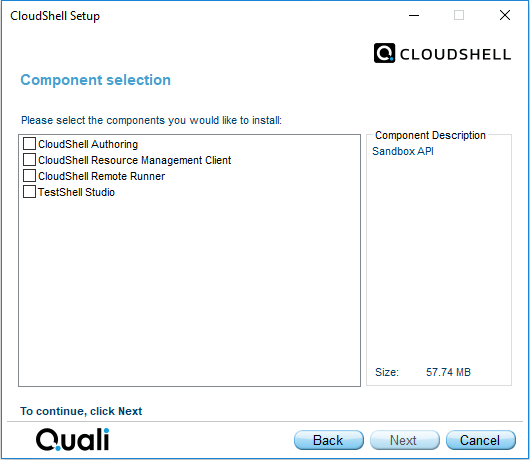
The available components are listed in the following table:
Component Description CloudShell Authoring The Authoring desktop application provides a code-free hardware interface editor for quick driver development for any blueprint, supporting full equipment interchangeability for easy collaboration. CloudShell Resource Management Client The Resource Manager Client desktop application provides GUI based resource modeling and lab management capabilities [Admin only]. CloudShell Remote Runner The Remote Runner desktop application executes CloudShell specific automation steps or completes scenarios on remote stations, enabling the execution of any script or protocol on a remote machine without requiring complex infrastructure. TestShell Studio The Studio desktop application provides GUI based test authoring and execution. -
Click Next to proceed to Select the Database Type.
Server Component selection
-
In the Component selection window, select the components to install.
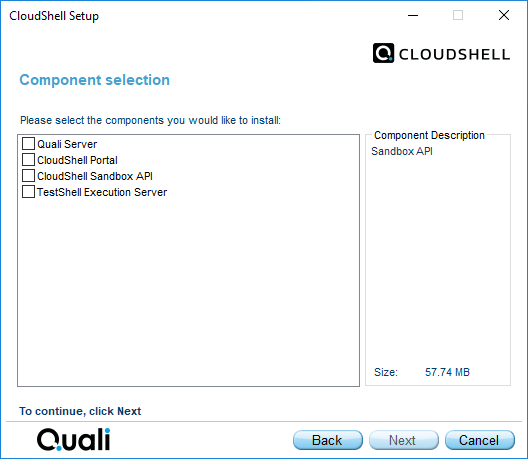
The available components are listed in the following table:
Component Description Quali Server Quali Server is the central application responsible for running the CloudShell framework and managing the CloudShell data. CloudShell Portal CloudShell Portal is a self-service web client that enables you to manage your data center, create and manage blueprints and sandboxes, as well as manage and schedule your automated testing.
You can leverage CloudShell's extensive automation capabilities to run blueprint and resource commands as well as automate business use cases within sandboxes.CloudShell Sandbox API Sandbox API allows you to automate the deployment and consumption of CloudShell sandboxes and can be integrated with different software interfaces, such as Jenkins and TeamCity, for example, to develop and automate Continuous Integration/DevOps processes.
Note: You can install the CloudShell Sandbox API service either on the same machine on which CloudShell Portal/Quali Server is installed, or on a different machine, and you can install several instances of this service on several machines. For configuration details, see Configure CloudShell Sandbox API.TestShell Execution Server Execution Server runs TestShell tests and automation commands in CloudShell sandboxes and sandbox elements. -
Click Next to proceed to Select the Database Type.
Standalone Component selection
-
In the Component selection window, select the components to install.
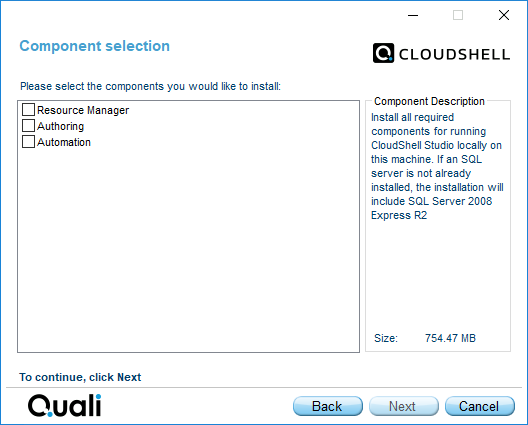
The available components are listed in the following table:
Component Description Resource Manager The Resource Manager Client desktop application provides GUI based resource modeling and lab management capabilities [Admin only]. Authoring The Authoring desktop application provides a code-free hardware interface editor for quick driver development for any blueprint, supporting full equipment interchangeability for easy collaboration. Automation Automation installs the required components for running TestShell Studio locally on this machine. If an SQL server is not already installed, CloudShell will install Microsoft SQL Server 2019 Express. -
Click Next to proceed to Select the Database Type.