Add an Azure App Template
The App template defines the settings and configurations of the VM to be deployed in the sandbox as well as the application(s) to be installed on that VM.
- By default, all public cloud Apps of the same type in the same sandbox are deployed within the same subnet and therefore are connected to each other and isolated from other sandboxes. However, using the Subnet service, blueprint designers can set up multiple subnet networks in the sandbox, instead of having one default subnet for all the Apps of the same cloud provider. For details, see Subnet Connectivity.
- Public cloud App deployment requires the management network and subnet(s) to be prepared in advance as part of the sandbox Setup process. CloudShell's out-of-the-box Setup process does this. However, the blueprint must include at least one public cloud App to initiate the Setup script's connectivity preparation process for deployment in that public cloud.
To add a new Azure App template:
-
Click + Add.
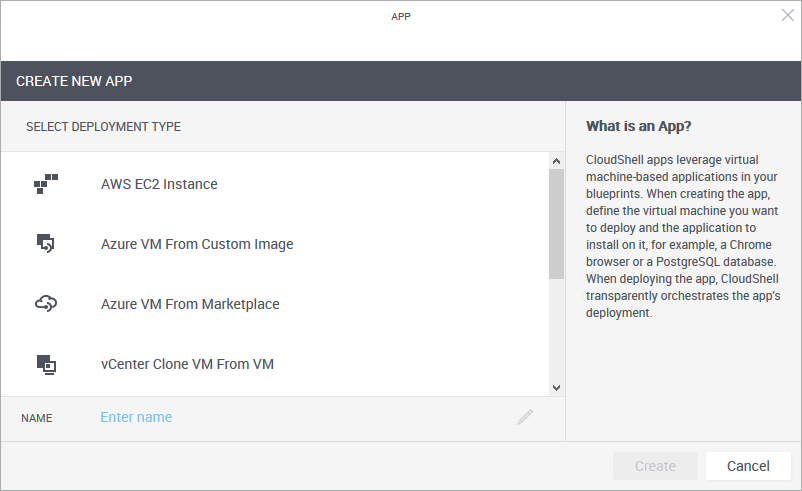
The Create New App wizard is displayed.
-
From the Select Deployment Type pane, select the Azure deployment type.
-
Enter a Name for the App template.
noteThe App template's name has a limit of 100 characters and can only contain alpha-numeric characters, spaces, and the following characters: | . - _ ] [
-
Click Create.
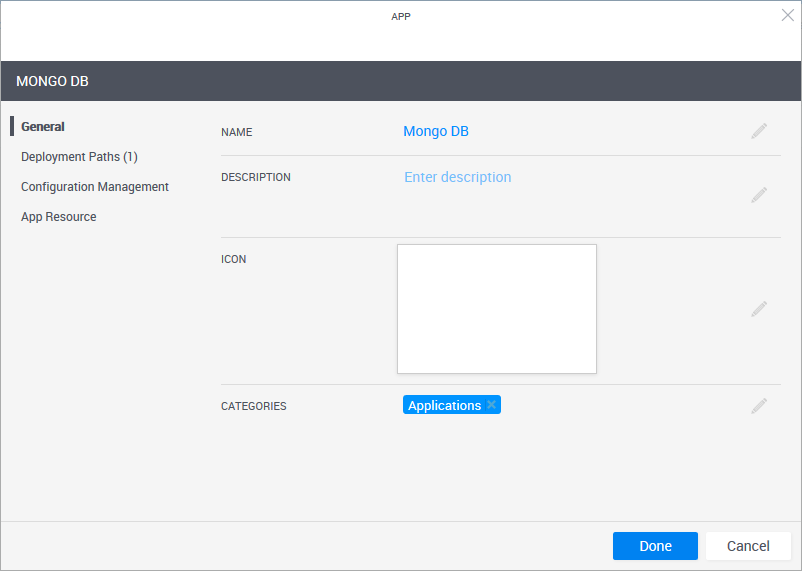
The App template is created and the App wizard's General page is displayed.
-
In the General page, define the App template's display settings and category.
Field Required Description Name Required App name that is displayed in the catalog. Description Optional Description of the App. Icon Optional Add an image to the catalog definition. The recommended size for the image is 190x120 pixels (image size is limited to 400x400 pixels or 200 KB). Categories Optional Service categories are a method to classify Apps. The Apps are displayed in the Add App / Service side pane in the blueprint and sandbox diagram, arranged in categories. Only users who are permitted to view the category can access the App. Apps without a category are not displayed.
By default, the Applications category is selected.
Select a category from the dropdown list. You can select additional categories. Examples of categories are: applications, networking and VLAN.
Notes:- The category must be associated with the domain in which the required cloud provider resides. For information about domain categories, see Managing domain categories.
- It is recommended to use up to a 2-level hierarchy when organizing the Add App / Service catalog (i.e. root and sub-category).
- In the Add App / Service side pane, Apps are displayed in the root category only. This includes services associated to sub-categories.
-
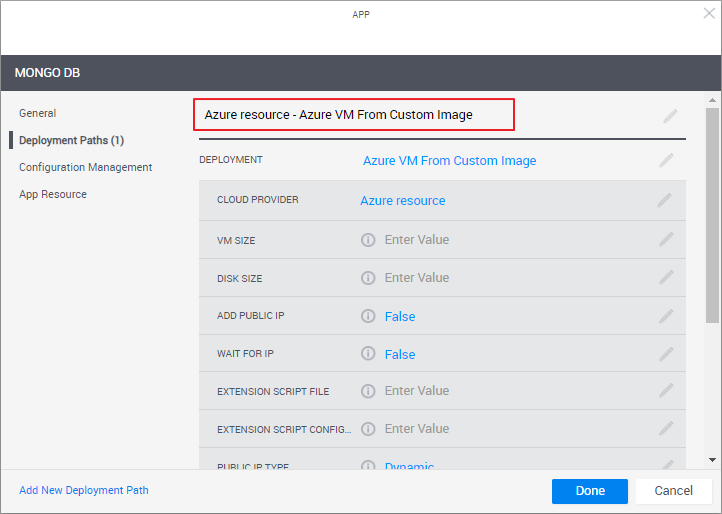
In the left pane, click Deployment Paths and configure the App template's deployment path.
A deployment path consists of (1) the selected deployment type (the method to be used to deploy the VM), (2) the VM’s settings such as storage size, CPU and image file, and (3) the CloudShell cloud provider resource that enables CloudShell to access the cloud provider and deploy the VM on it.
Note the deployment path's name (highlighted in the image below). The path's name is dynamic and consists of the selected Cloud Provider resource and Deployment type. You can change the name of the path by clicking the field.
-
From the Deployment drop down list, select the deployment type.
The selected deployment type's attributes are displayed.
importantDeployment types related to the Azure 2nd Gen cloud provider shell include "2nd Gen" in the title (for example: "Azure VM from Marketplace 2nd Gen").
-
Fill in the details.
-
For Azure VM From Custom Image attributes
Attribute Azure shell version Description Cloud Provider All Name of the Azure cloud provider resource to be used Azure Image All Name of the custom image. The image name is listed in the Images blade of the Azure portal. Azure Resource Group All Name of the resource group in which the custom image resides. VM Size All (Optional) Size of the Microsoft Azure computing resources, including CPU, memory and networking capacity of the VM. Leave it empty to use the default VM Size that was set in the cloud provider resource. For example: "Standard_A1_v2”.
Make sure the VM size you specify is supported by the image you defined in the App.
importantFor Azure Apps that will run configuration management operations, specify a VM size of Standard_A2_v2 or larger.
For additional information, see the Azure help page Sizes for virtual machines in Azure or use Azure CLI to get a list of your region's supported sizes.
Disk Type All Type of disk to use for the VM's operating system. Possible options depend on the shell version:
Azure 1G shell:
- HDD (default)
- SSD
Azure 2G shell:
- Standard HDD
- Standard SSD
- Premium SSD
- Standard SSD (zone-redundant storage)
- Premium SSD (zone-redundant storage)
Disk Size All (Optional) Disk size (in GB) of the VM's operating system. For example, "17” or "35”.
If you leave it empty, CloudShell will determine the disk size according to the App's VM Size.
Data Disks 2G Semicolon-separated list of data disks that will be added to the VM.
The syntax is:
disk_name:disk_size,disk_typeFor example:
disk1:10;disk2:20,Premium SSD;disk3:20,Standard SSD (zone-redundant storage)Supported disk types are:
- Standard HDD (default)
- Standard SSD
- Premium SSD
- Ultra SSD
- Standard SSD (zone-redundant storage)
- Premium SSD (zone-redundant storage)
License Type 2G Optionally apply an OS license you own to the VM.
Options are:
- No License: None
- Windows OS: Windows_Client
- Windows Server OS: Windows_Server
- Red Hat Enterprise Linux (RHEL): RJE:_BYOS
- SUSE Linux Enterprise Server (SLES): SLES_BYOS
Enable Boot Diagnostics 2G Enable Boot diagnostics for the VM. For additional information, see Microsoft Docs' Azure boot diagnostics article. Boot Diagnostics Storage Account 2G The name of a storage account where boot diagnostic artifacts will be stored. Enter "Sandbox Storage" to use the storage account created by the sandbox. By default: the managed storage account is used if Enable Boot Diagnostics is enabled. Resource Group Name 2G (Optional) The name of the predefined resource group where the VM will be deployed. This resource group will contain all cloud resources created for the VM (such as network interfaces, security groups, disks and the VM itself). When the VM tears down, its cloud resources will be deleted from the resource group but the resource group will remain. Add Public IP All Set to True to use a public IP address to communicate with the VM from outside the virtual network.
In most cases the public IP address is associated with the VM until the VM is stopped or terminated, after which the IP is no longer available. To ensure that the IP is available to your subscription at any time, reserve it by setting the Public IPType attribute to Static.
Wait for IP All Determines if the App deployment process waits for the VM to get an IP. Default is False. Extension Script File / Configuration All (Optional) Custom extension script (PowerShell, Python, batch, etc.) to execute on the deployed VM.
-
Extension Script File: Raw URL of the script file
-
Extension Script Configuration: Space-separated value containing the tool to be used to execute the script, such as Python or PowerShell, the script's file name and extension, and any inputs that need to be passed to the script. For example:
python my_script.py input1input2Notes:-
For non-PowerShell scripts, the tool to be used to execute the script must be installed on the VM.
-
For Linux VMs, you must specify the tool to be used. For Windows VMs, PowerShell is used by default, unless a different tool is specified.
-
Extension scripts are not supported on Kali Linux images in Azure Marketplace. To fix this issue, you will need to use a modified version of the Marketplace image:
-
Deploy a VM based on the Kali Linux Marketplace image.
-
Run the following command:
sudo nano /usr/lib/python3/dist-packages/azurelinuxagent/common/osutil/factory.py -
Find the line:
from .debian import DebianOSModernUtil -
Replace with:
from .debian import DebianOSModernUtil,DebianOSBaseUtil -
Press [CTRL] + [O] and [Enter] keys.
-
Press [CTRL] + [X] and [Enter] keys.
-
Restart the walinuxagent.service service.
-
Create a custom image out of the VM.
-
-
noteTo support the execution of extension scripts, custom images created outside of Azure Marketplace must include the ProvisionGuestAgent agent. For additional information, see Virtual machine extensions and features for Windows.
Public IP Type All Set to Static to ensure that the VM always uses the same public IP. By default, public IPs are Dynamic and the address associated to them may change when the VM is powered off. Inbound Ports All (Optional) Semi-colon separated list of ports and protocols to open for inbound traffic. Note that by default access from the management VPC is allowed and all ports are open for traffic between Azure App VMs within the sandbox, but this can be changed using the Allow All Sandbox Traffic attribute.
In addition, all outbound traffic is allowed.
The syntax is:
port[single/range]:protocol[tcp(default)/udp]For example: "80;443:tcp;200-220:udp".
noteIf not specified, the protocol defaults to TCP.
Tips:- To allow QualiX in-browser connections to the VM from the sandbox, include port "22".
- To set more specific security groups, it is recommended to use the TestShell API's SetAppsSecurityGroup method instead. Unlike the Inbound Ports attribute, it enables you to define different port settings per subnet and allow inbound access to specific source CIDRs. For additional information, see SetAppSecurityGroups Code Example.
Custom Tags 2G Semi-colon separated list of up to 9 tags to be applied to all related Azure objects created during the App deployment, such as the sandbox's resource group, VNETs, subnets, NSGs and VMs. Attribute supports the following syntax: [TagName]=[TagValue]; [TagName]=[TagValue]. For example: "Tag1=Val1;Tag2=Val2” Allow All Sandbox Traffic All Determines if the App allows inbound traffic from all other Azure Apps in the sandbox. If set to False, the App's VM will be isolated. Access from specific Apps or subnets can be defined using the Inbound Ports attribute or API.
noteBy default, this attribute is True, and access is allowed to all ports from all Apps in the sandbox. By default, all ports are open for traffic within the sandbox.
Enable IP Forwarding 2G Enables IP forwarding on all network interfaces of the app in order to support virtual appliances like routers and firewalls that are connected to multiple subnets. Autoload 2G Enables the automatic execution of the Autoload command during reservation Setup. Availability Zones 2G Specify the Availability Zone (1, 2, or 3) in which the App’s VM, managed disk and public IP (if available) will be deployed. Leave empty to inherit the Availability Zones defined on the cloud provider resource. For details and supported regions, see Regions and availability zones. -
For Azure VM From Marketplace attributes
noteEvery VM deployed from a Marketplace image is created with a managed disk, which is deleted when the sandbox ends.
importantIf you want to deploy a third party application from a Marketplace image, make sure Programmatic Deployment is enabled for the image in the subscription. To enable, log in to Azure and open the Marketplace, find the image and click it, select the Want to deploy programmatically? Get started link at the bottom of the blade that appears. Then, in the Configure Programmatic Deployment blade, scroll down to the bottom, select Enable for the appropriate subscription and click Save. For additional information, see the following Azure help page: Working with Marketplace Images on Azure Resource Manager.
Attribute Azure shell version Description Cloud Provider All Name of the Azure cloud provider resource to be used Image Publisher All Define the VM image's Publisher, Offer and SKU.
noteThe Publisher, Offer and SKU must exist in the Azure region where the VM will be deployed.
For typical image properties, see the following Azure help pages: Linux VM images and Windows VM images.
Image Offer All Image Offer Image SKU All Image SKU VM Size All (Optional) Size of the Microsoft Azure VM. This parameter determines the CPU, memory and networking capacity of the VM. Leave it empty to use the default VM Size that was set in the cloud provider resource. For example: "Standard_A1_v2”.
importantFor Azure Apps that will run configuration management operations, specify a VM size of Standard_A2_v2 or larger.
Disk Type All Type of disk to use for the VM's operating system. Possible options depend on the shell version:
Azure 1G shell:
- HDD (default)
- SSD
Azure 2G shell:
- Standard HDD
- Standard SSD
- Premium SSD
- Standard SSD (zone-redundant storage)
- Premium SSD (zone-redundant storage)
Disk Size All (Optional) Disk size (in GB) of the VM's operating system. For example, "17” or "35”.
If you leave it empty, CloudShell will determine the disk size according to the App's VM Size.
Data Disks 2G Semicolon-separated list of data disks that will be added to the VM.
The syntax is:
disk_name:disk_size,disk_typeFor example:
disk1:10;disk2:20,Premium SSD;disk3:20,Standard SSD (zone-redundant storage)Supported disk types are:
- Standard HDD (default)
- Standard SSD
- Premium SSD
- Ultra SSD
- Standard SSD (zone-redundant storage)
- Premium SSD (zone-redundant storage)
License Type 2G Optionally apply an OS license you own to the VM.
Options are:
- No License: None
- Windows OS: Windows_Client
- Windows Server OS: Windows_Server
- Red Hat Enterprise Linux (RHEL): RJE:_BYOS
- SUSE Linux Enterprise Server (SLES): SLES_BYOS
Enable Boot Diagnostics 2G Enable Boot diagnostics for the VM. For additional information, see Microsoft Docs' Azure boot diagnostics article. Boot Diagnostics Storage Account 2G The name of a storage account where boot diagnostic artifacts will be stored. Enter "Sandbox Storage" to use the storage account created by the sandbox. By default: the managed storage account is used if Enable Boot Diagnostics is enabled. Resource Group Name 2G (Optional) The name of the predefined resource group where the VM will be deployed. This resource group will contain all cloud resources created for the VM (such as network interfaces, security groups, disks and the VM itself). When the VM tears down, its cloud resources will be deleted from the resource group but the resource group will remain. Add Public IP All Set to True to use a public IP address to communicate with the VM from outside the virtual network.
In most cases the public IP address is associated with the VM until the VM is stopped or terminated, after which the IP is no longer available. To ensure that the IP is available to your subscription at any time, reserve it by setting the Public IP Type attribute to Static.
Wait for IP All Determines if the App deployment process waits for the VM to get an IP. Default is False. Extension Script File / Configuration All (Optional) Custom extension script (PowerShell, Python, batch, etc.) to execute on the deployed VM.
-
Extension Script File: Raw URL of the script file
-
Extension Script Configuration: Space-separated value containing the tool to be used to execute the script, such as Python or PowerShell, the script's file name and extension, and any inputs that need to be passed to the script. For example:
python my_script.py input1input2Notes:-
For non-PowerShell scripts, the tool to be used to execute the script must be installed on the VM.
-
For Linux VMs, you must specify the tool to be used. For Windows VMs, PowerShell is used by default, unless a different tool is specified.
-
Extension scripts are not supported on Kali Linux images in Azure Marketplace. To fix this issue, you will need to use a modified version of the Marketplace image:
-
Deploy a VM based on the Kali Linux Marketplace image.
-
Run the following command:
sudo nano /usr/lib/python3/dist-packages/azurelinuxagent/common/osutil/factory.py -
Find the line:
from .debian import DebianOSModernUtil -
Replace with:
from .debian import DebianOSModernUtil,DebianOSBaseUtil -
Press [CTRL] + [O] and [Enter] keys.
-
Press [CTRL] + [X] and [Enter] keys.
-
Restart the walinuxagent.service service.
-
Create a custom image out of the VM.
-
-
Public IP Type All Set to Static to ensure that the VM always uses the same public IP. By default, public IPs are Dynamic and the address associated to them may change when the VM is powered off. Inbound Ports All (Optional) Semi-colon separated list of ports and protocols to open for inbound traffic. Note that by default access from the management VPC is allowed and all ports are open for traffic between Azure App VMs within the sandbox, but this can be changed using the Allow All Sandbox Traffic attribute.
In addition, all outbound traffic is allowed.
The syntax is:
port[single/range]:protocol[tcp(default)/udp]For example: "80;443:tcp;200-220:udp".
noteIf not specified, the protocol defaults to TCP.
Tips:- To allow QualiX in-browser connections to the VM from the sandbox, include port "22".
- To set more specific security groups, it is recommended to use the TestShell API's SetAppsSecurityGroup method instead. Unlike the Inbound Ports attribute, it enables you to define different port settings per subnet and allow inbound access to specific source CIDRs. For additional information, see SetAppSecurityGroups Code Example.
Custom Tags 2G Semi-colon separated list of up to 9 tags to be applied to all related Azure objects created during the App deployment, such as the sandbox's resource group, VNETs, subnets, NSGs and VMs. Attribute supports the following syntax: [TagName]=[TagValue]; [TagName]=[TagValue]. For example: "Tag1=Val1;Tag2=Val2” Allow All Sandbox Traffic All Determines if the App allows inbound traffic from all other Azure Apps in the sandbox. If set to False, the App's VM will be isolated. Access from specific Apps or subnets can be defined using the Inbound Ports attribute or API.
noteBy default, this attribute is True, and access is allowed to all ports from all Apps in the sandbox. By default, all ports are open for traffic within the sandbox.
Enable IP Forwarding 2G Enables IP forwarding on all network interfaces of the app in order to support virtual appliances like routers and firewalls that are connected to multiple subnets. Autoload 2G Enables the automatic execution of the Autoload command during reservation Setup. Availability Zones 2G Specify the Availability Zone (1, 2, or 3) in which the App’s VM, managed disk and public IP (if available) will be deployed. Leave empty to inherit the Availability Zones defined on the cloud provider resource. For details and supported regions, see Regions and availability zones. -
For Azure VM From Gallery Image 2nd Gen attributes
Attribute Description Cloud Provider Name of the Azure cloud provider resource to be used Shared Image Gallery Name of the shared image gallery to be used to create a VM. The image gallery is listed in the Shared image galleries blade of the Azure portal. Image Definition The image definition is listed in the Image definitions blade of the Azure portal. Image Version Name of the image version to be used to create Azure VMs. Use "latest" if version is unavailable. Shared Gallery Resource Group Resource group in which the shared image gallery resides. Shared Gallery Image Subscription ID The subscription ID of the shared image gallery. Use "current" if not set. VM Size (Optional) Size of the Microsoft Azure computing resources, including CPU, memory and networking capacity of the VM. Leave it empty to use the default VM Size that was set in the cloud provider resource. For example: "Standard_A1_v2”.
importantFor Azure Apps that will run configuration management operations, specify a VM size of Standard_A2_v2 or larger.
For additional information, see the Azure help page Sizes for virtual machines in Azure or use Azure CLI to get a list of your region's supported sizes.
Disk Type Type of disk to use for the VM's operating system.
- Standard HDD
- Standard SSD
- Premium SSD
- Standard SSD (zone-redundant storage)
- Premium SSD (zone-redundant storage)
Disk Size (Optional) Disk size (in GB) of the VM's operating system. For example, "17” or "35”.
If you leave it empty, CloudShell will determine the disk size according to the App's VM Size.
Data Disks Semicolon-separated list of data disks that will be added to the VM.
The syntax is:
disk_name:disk_size,disk_typeFor example:
disk1:10;disk2:20,Premium SSD;disk3:20,Standard SSD (zone-redundant storage)Supported disk types are:
- Standard HDD (default)
- Standard SSD
- Premium SSD
- Ultra SSD
- Standard SSD (zone-redundant storage)
- Premium SSD (zone-redundant storage)
License Type Optionally apply an OS license you own to the VM.
Options are:
- No License: None
- Windows OS: Windows_Client
- Windows Server OS: Windows_Server
- Red Hat Enterprise Linux (RHEL): RJE:_BYOS
- SUSE Linux Enterprise Server (SLES): SLES_BYOS
Enable Boot Diagnostics Enable Boot diagnostics for the VM. For additional information, see Microsoft Docs' Azure boot diagnostics article. Boot Diagnostics Storage Account The name of a storage account where boot diagnostic artifacts will be stored. Enter "Sandbox Storage" to use the storage account created by the sandbox. By default: the managed storage account is used if Enable Boot Diagnostics is enabled. Resource Group Name (Optional) The name of the predefined resource group where the VM will be deployed. This resource group will contain all cloud resources created for the VM (such as network interfaces, security groups, disks and the VM itself). When the VM tears down, its cloud resources will be deleted from the resource group but the resource group will remain. Add Public IP Set to True to use a public IP address to communicate with the VM from outside the virtual network.
In most cases the public IP address is associated with the VM until the VM is stopped or terminated, after which the IP is no longer available. To ensure that the IP is available to your subscription at any time, reserve it by setting the Public IPType attribute to Static.
Wait for IP Determines if the App deployment process waits for the VM to get an IP. Default is False. Extension Script File / Configuration (Optional) Custom extension script (PowerShell, Python, batch, etc.) to execute on the deployed VM.
-
Extension Script File: Raw URL of the script file
-
Extension Script Configuration: Space-separated value containing the tool to be used to execute the script, such as Python or PowerShell, the script's file name and extension, and any inputs that need to be passed to the script. For example:
python my_script.py input1input2Notes:-
For non-PowerShell scripts, the tool to be used to execute the script must be installed on the VM.
-
For Linux VMs, you must specify the tool to be used. For Windows VMs, PowerShell is used by default, unless a different tool is specified.
-
Extension scripts are not supported on Kali Linux images in Azure Marketplace. To fix this issue, you will need to use a modified version of the Marketplace image:
-
Deploy a VM based on the Kali Linux Marketplace image.
-
Run the following command:
sudo nano /usr/lib/python3/dist-packages/azurelinuxagent/common/osutil/factory.py -
Find the line:
from .debian import DebianOSModernUtil -
Replace with:
from .debian import DebianOSModernUtil,DebianOSBaseUtil -
Press [CTRL] + [O] and [Enter] keys.
-
Press [CTRL] + [X] and [Enter] keys.
-
Restart the walinuxagent.service service.
-
Create a custom image out of the VM.
-
-
noteTo support the execution of extension scripts, custom images created outside of Azure Marketplace must include the ProvisionGuestAgent agent. For additional information, see Virtual machine extensions and features for Windows.
Public IP Type Set to Static to ensure that the VM always uses the same public IP. By default, public IPs are Dynamic and the address associated to them may change when the VM is powered off. Inbound Ports (Optional) Semi-colon separated list of ports and protocols to open for inbound traffic. Note that by default access from the management VPC is allowed and all ports are open for traffic between Azure App VMs within the sandbox, but this can be changed using the Allow All Sandbox Traffic attribute.
In addition, all outbound traffic is allowed.
The syntax is:
port[single/range]:protocol[tcp(default)/udp]For example: "80;443:tcp;200-220:udp".
noteIf not specified, the protocol defaults to TCP.
Tips:- To allow QualiX in-browser connections to the VM from the sandbox, include port "22".
- To set more specific security groups, it is recommended to use the TestShell API's SetAppsSecurityGroup method instead. Unlike the Inbound Ports attribute, it enables you to define different port settings per subnet and allow inbound access to specific source CIDRs. For additional information, see SetAppSecurityGroups Code Example.
Custom Tags Semi-colon separated list of up to 9 tags to be applied to all related Azure objects created during the App deployment, such as the sandbox's resource group, VNETs, subnets, NSGs and VMs. Attribute supports the following syntax: [TagName]=[TagValue]; [TagName]=[TagValue]. For example: "Tag1=Val1;Tag2=Val2” Allow All Sandbox Traffic Determines if the App allows inbound traffic from all other Azure Apps in the sandbox. If set to False, the App's VM will be isolated. Access from specific Apps or subnets can be defined using the Inbound Ports attribute or API.
noteBy default, this attribute is True, and access is allowed to all ports from all Apps in the sandbox. By default, all ports are open for traffic within the sandbox.
Enable IP Forwarding Enables IP forwarding on all network interfaces of the app in order to support virtual appliances like routers and firewalls that are connected to multiple subnets. Autoload Enables the automatic execution of the Autoload command during reservation Setup. Availability Zones Specify the Availability Zone (1, 2, or 3) in which the App’s VM, managed disk and public IP (if available) will be deployed. Leave empty to inherit the Availability Zones defined on the cloud provider resource. For details and supported regions, see Regions and availability zones.
-
-
-
To add additional deployment paths to the App template, click the Add New Deployment Path link at the bottom of the wizard and fill in the required information.
-
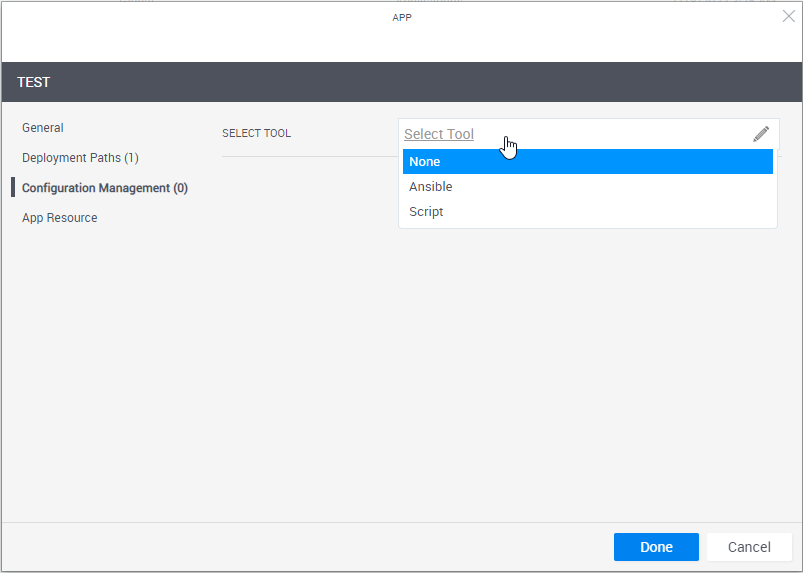
In the left pane, click Configuration Management and configure the application to be installed on the VM.
 tip
tipTo learn how to develop custom scripts and Ansible playbooks, including examples, and set up support for the desired configuration management tool, see Developing Configuration Management Scripts for Apps.
Notes:-
To run configuration management on an Azure App, make sure the App's VM size is Basic_A2 or larger.
-
For configuration management operations, CloudShell uses an available Execution Server (for Ansible, it's a Linux Execution Server that has the Supports Ansible flag).
If the cloud provider resource has an Execution Server Selector configured, it will use that selector. If the selector is empty, CloudShell will use the selector defined in the appropriate Resource Manager Client >Configuration Services model (Ansible Configuration or Custom Script Configuration).
-
Execution Server selectors specified on the deployed App shell/resource are not used to execute configuration management operations.
-
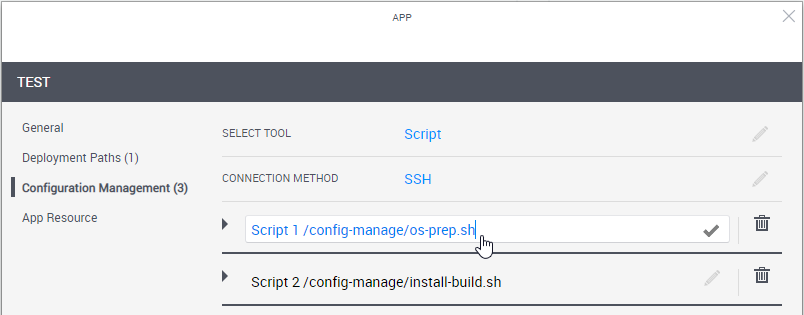
Define the script or playbook to install.
Attribute Description Select Tool Select the application's installation and configuration tool.
- None: Do not use any Configuration Management option. Use this option if, for example, the image or template already contains the application to install.
- Script: Select the custom script to run (PowerShell, bash or sh).
- Ansible: (Intended for customers who are already using Ansible) Select the Ansible playbook to run.
Note that the playbook runs once for all of the sandbox's Apps that use that playbook, after CloudShell has finished deploying their VMs.note
The playbook runs once during the Setup phase for all of the sandbox's Apps that use that playbook, after CloudShell has finished deploying their VMs. This is done both to improve performance and support cross-server logic where multiple applications need to be installed and configured in a certain way.
Depending on the selection, additional options may become available.
Connection Method The method to use to connect to the VM.
Select:
- SSH if the VM has a Linux OS
- Windows Remote Management if the VM has a Windows OS
noteTo run configuration management on a Windows VM, the VM must have WinRM enabled. For details, see Enable WinRM on Windows VMs to Support Configuration Management.
Playbook / Script Location Details of the Ansible playbook or custom script.
-
URL: Raw URL of the Ansible playbook or ZIP file, or custom script on the online repository (GitHub, GitLab and BitBucket are supported). URL must be accessible to the Execution Servers.
tipThe URL can accept parameters defined on the App, enabling you to test new versions of scripts without affecting consumer-ready versions. For example, you can have an App everyone is using, but if you want to test a version you're developing, simply change the value of the URL parameter in the test blueprint.
- To use parameters, specify the parameter name in curly brackets (for example: {branch}).
- If the App has this parameter, CloudShell will replace the {branch} with its value during execution.
- If the parameter is missing, CloudShell will replace {branch} with an empty string.
- If you are using a global input, customers would be well advised to set a default value on the global input
For GitHub, specify the raw URL. For example:
https://raw.githubusercontent.com/.../site.ymlFor GitLab, specify the API endpoint in the format:
https://gitlab.com/api/v4/projects/{Project ID}/repository/files/testsharding%2Eyml/raw?ref=masterWhere:
-
Each special character that the file contains has to be encoded. In the example above - "%2E” is an encoded point (".”)
-
The ref value is the branch name (master for this example)
For BitBucket Data Center (on premise), use the following URL format:
http://{datacenter server IP}/rest/api/1.0/projects/{projectKey}/repos/{repository name}/raw/testsharding.ymlFor BitBucket Cloud, use one of the following:
-
For source code files, specify the API endpoint:
https://api.bitbucket.org/2.0/repositories/{workspace}/{repository name}/src/{GUID- the Commit hash string}/testsharding.yml -
For download files (files residing in the repository's "Downloads" folder), specify this endpoint:
https://api.bitbucket.org/2.0/repositories/{workspace}/{repository name}/downloads/site.yml
importantIf the URL is private (HTTPS), the VM will need to have a valid SSL certificate. To disable the certificate check, open Resource Manager Client>Resource Families>Configuration Services (Ansible Configuration or Custom Script Configurationn) and set the Verify Certificate attribute to False.
-
User/Password: (For private repositories) Access credentials or token to the script/playbook's online repository.
-
Token: (For private repositories) Access token to the script/playbook's online repository.
For GitHub and GitLab, specify the API token. For BitBucket Cloud, set the repo's "App Password" in the App template's Password field. For BitBucket Data Center, specify the personal access token.
Notes:- For Custom Script configurations: In SSH mode, only bash and sh scripts are allowed. In WinRM mode, only PowerShell scripts are allowed. WinRM over HTTPS only applies to custom scripts at this time. If WinRM is configured to run over HTTPS, the execution server will first try to run the custom script over HTTPS and then fall back to HTTP if HTTPS is unsuccessful. To prevent the fallback, set the winrm_transport parameter to ssl.
- For Ansible configurations: The Ansible playbook must be a YML or YAML file. To specify multiple playbooks or a hierarchy of an Ansible project, you can specify multiple Ansible playbooks or a ZIP package. For example:
https://raw.githubusercontent.com/QualiSystemsLab/private-repo-zip-download/master/README.zip - If a ZIP containing 2 or more playbooks is specified, CloudShell will use the playbook file titled
site.ymlorsite.yaml. If the file is missing, the App's deployment will fail.
Inventory Groups (For Ansible) Specify the host groups for the application to be installed, separated by semicolons (;). The newly deployed VM will be associated to these groups, thus allowing plays that target these groups to run on the VM.
For example:
Servers/AppServers;Servers/DBServersParameters Parameters to be passed to the Ansible playbook or custom script. Specify the parameters and their default values.
In the blueprint or sandbox diagram, privileged users can also set the parameter to receive the value that is specified for a global input when reserving a sandbox containing the App. This is done by selecting the global input when editing the App in the blueprint or sandbox diagram. For example, a global input that specifies the build number of a product to be tested or which components of a product to install.
important(For Ansible) To customize the port to be used to communicate with the VM, add the
Ansible_portparameter. Default:SSH/Port: 22/WinRM: 5985.Additional Arguments (For Ansible) Define arguments to be passed to the execution of the playbook (
Ansible-playbookcommand). For example,-vwill set verbose mode on while-fwill set the maximum number of VMs to be handled in parallel. Multiple arguments can be given, separated by spaces. For additional information on possible arguments, see the official Ansible documentation.The arguments must be specified in Resource Manager Client > Configuration Services family > Ansible Configuration model > Ansible Additional Arguments attribute.
noteThe arguments are defined globally for all Apps using Ansible.
importantTo configure Ansible to connect to certified hosts only (Linux VMs with a valid 'known_hosts' key), include the following additional arguments:
--ssh-extra-args='-o StrictHostKeyChecking=yes' -
To enable the end-user to rerun the App's configuration management on the deployed App in the sandbox, select Allow rerunning configuration management for resources deployed from the App. Once the App's deployment completes, a Rerun Configuration Management command is included in the deployed App's Application Commands pane. For details, see Run App Commands. This is useful for rolling back the App's VM to its original state.
-
To enable blueprint and sandbox owners to modify the App's Configuration Management details, select Allow blueprint/sandbox owners to modify the App's Configuration Management. The following details can be modified: playbook/script, authentication details, inventory groups, and parameters. Note that the modifications only apply to the blueprint or sandbox of the instance.
-
Optionally click the Add New Script/Playbook link at the bottom right to add additional custom scripts/Ansible playbooks to the App. The scripts will run in their display order, from top to bottom. You can drag scripts up or down to rearrange.
-
To change the script's alias, click the script's name and change as appropriate.
-
-
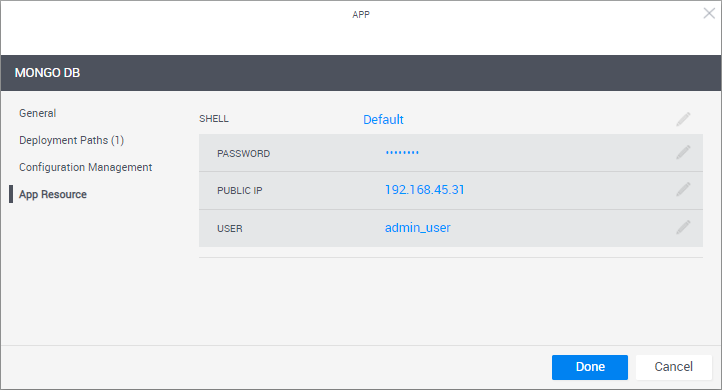
In the left pane, click App Resource to optionally set the VM's operating system user credentials (for example, to connect to the VM via RDP or SSH). You can also change the deployed App's Shell.
 important
To help sandbox end-users connect to the VM, it is recommended to include the User and Password in the blueprint's instructions. For additional information, see Add Instructions.
Attribute Description Shell The Shell on which the App's VMs are based. When an App is deployed in a sandbox, it changes into a "deployed App resource", which is based on the selected Shell. By default, the "Generic App Model" Shell is used.
Deployed Apps include a default set of commands such as Power On and Refresh IP, and the VM's User and Password attributes, as explained below.
noteChanging the Shell might cause additional fields to become visible and you may need to enter further information.
User User defined in the App's image. The User/Password credentials are used by QualiX to create in-browser connections to the VM from within the sandbox.
Notes:- For AWS instances, make sure to set the User of a user that already exists on the Amazon machine image. For custom images, the image owner should know the credentials, while community/marketplace images have the image's credentials listed in their documentation.
- Azure VM username and password restrictions apply. For details, see Frequently asked question about Windows Virtual Machines.
- For Azure Marketplace images, CloudShell will create a user on the VM based on the User/Password credentials you specify.
- For Azure Marketplace VMs, if the user is not set, CloudShell will set adminuser as the default user name.
Password VM user's password.
Notes:- For AWS Marketplace images, leave the Password empty. The AWS shell generates a new key-pair for each sandbox, which QualiX will use to establish the in-browser connection.
- For Azure Marketplace images:
- If the password is not set, only the user name will be required. For Linux VMs, CloudShell will create an SSH key-pair to enable a secure connection.
- If the password is set, it will be displayed as asterisks (******) in the blueprint or sandbox.
-
Click Done.
The new App template is displayed in the Apps page.