Configuring Single Logout (SLO)
SSO/SLO configuration is available with CloudShell Premium Tier.
Single logout (SLO) invalidates CloudShell single sign-on (SSO) sessions and redirects the logging out user to their defined logout page. If your CloudShell deployment includes multiple domains, where each domain uses a different logout page, each one of your users will be redirected to their respective logout page.
SLO must be used in conjunction with SSO.
Creating an SSL certificate
The first step is to create an SSL certificate, which you will need to install on all CloudShell Portal machines.
To create an SSL certificate:
-
In your personal store, create an SSL certificate with a private key.
-
If CloudShell Portal is not installed on the Quali Server machine, copy the
C:\Program Files (x86)\QualiSystems\CloudShell\Server\Certificates\makecert.exefile from the Quali Server machine to the Portal machine -
Create an SSL certificate:
cd "makecert.exe containing folder"makecert.exe -n "CN=My Company Development Root CA,O=My Company, OU=Development,L=Quali,S=NY,C=US" -pe -ss My -sr LocalMachine -sky exchange -m 120 -a sha1 -len 2048 -rWhere "My Company Development Root CA" is the name of the certificate
-
-
Export the certificate to all CloudShell Portal machines.
-
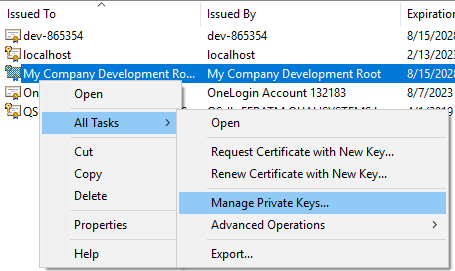
From the Start menu, search for the Manage Computer Certificates app and locate the certificate you created in the previous step.
The certificate should have the same name you gave it in the command. In our example: "My Company Development Root CA".
-
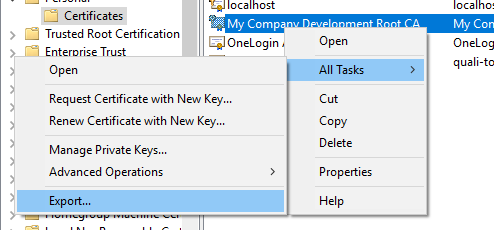
Right-click the certificate and select Export>All Tasks>Export.
-
In the Certificate Export Wizard, select Yes, export the private key.

-
Click Next.
-
Specify the Password to allow exporting the certificate.
-
Click Next, specify the file name. and complete the wizard.
-
Import the certificate to the personal store on all CloudShell Portal machines.
-
-
Export the certificate for the service provider.
-
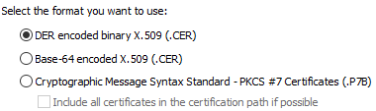
In the Certificate Export Wizard, select No, do not export the private key.

-
Select DER encoded binary X.509 (.CER).
-
Specify the file name and location of the
.cercertificate and complete the wizard. -
Import the generated public key to the service provider. Okta example:
-
In Okta, from the Applications menu, select the app you created for SSO..
-
In the General tab, edit the SAML settings.
-
Under SAML Settings, click Edit.
-
Proceed to SAML Settings.
-
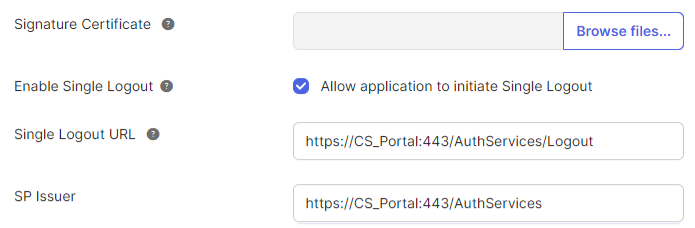
Select Show Advanced Settings, and set the following:
- Signature Certificate: Upload the public certificate.
- Enable Single Logout
- Single Logout URL: Specify the URL.
- SP Issuer: Specify the SP issuer URL.
noteIn some cases, you may also need to import the generated certificate to the trusted certificates folder in CloudShell Portal. Right-click the Trusted Root Certification>Certificates folder and select All Tasks>Import.
-
-
Configuring SAML SLO on each CloudShell Portal
Perform the following procedure on each CloudShell Portal machine.
To configure SAML SLO for CloudShell Portal:
-
Make sure SSO is configured. For details, see Configuring Single Sign-On (SSO).
-
Disable the
requireSslflag by adding the following code to theweb.configfile.noteThe
requireSslflag only applies to websites that do not use HTTPS. If HTTPS is used, perform the steps in the Configuring SAML SLO for CloudShell Portal in SSL mode section and carry on with the configuration process.<?xml version="1.0" encoding="UTF-8"?>
<system.identityModel.services>
<federationConfiguration>
<cookieHandler requireSsl="false" name="CloudShellAuthFederation" />
</federationConfiguration>
</system.identityModel.services>importantThe
web.configfile is overridden during a CloudShell patch or version upgrade. Therefore, make sure to keep a backup copy of the file, and after upgrade, replace the file's<system.identityModel.services>section with the one in the backup version. -
In the
Kentor.configfile, do the following:-
In the
<kentor.authServicessection, set the following properties (if the section is missing, add it).entityId: CloudShell Portal (service provider). IP address or DNS name, and port if CloudShell Portal is note using the default (8080). For example: "http://192.168.20.134:85/AuthServices"returnUrl: Logout page URL
For example:
<?xml version="1.0" encoding="utf-8"?>
<kentor.authServices entityId="http://192.168.30.27:6060/AuthServices"
returnUrl="http://192.168.30.27:6060/"> -
Under the
<identityProviders>section, set the following:entityId: Identity provider issuerlogoutUrl: Identity provider SLO URL
For example:
 <identityProviders>
    <add entityId="http://www.okta.com/exkdmzexSOj8bXgBB355"
    signOnUrl="https://quali-john.okta.com/app/qualiorg672652_john_1/exkdmzexSOj8bXgBB355/sso/saml"
    logoutUrl="https://quali-john.okta.com/app/qualiorg672652_john_1/exkdmzexSOj8bXgBB355/slo/saml"
 allowUnsolicitedAuthnResponse="true"
binding="HttpPost"> -
In the
Kentor.configfile, add a section that will point to the newly created certificate. For example:<serviceCertificates>
<!--add fileName="V:\Users\john.d\my-certificate.pfx" />-->
<add storeName="My" storeLocation="LocalMachine" findValue="54nb76caaa0018v67dd8h217jc7h1i9" x509FindType="FindBySerialNumber" use="Signing" />
</serviceCertificates>
-
-
Configure your identity provider. This typically includes setting the SLO logout page URL, CloudShell Portal issuer (for example: "
http://192.168.20.134/AuthServices") and .cer certificate file.To configure the identity provider on Okta:
-
Restart Quali Server and CloudShell Portal IIS services.
-
Log in to CloudShell Portal with your Idp user.
-
Log out of CloudShell Portal.
You are redirected to the defined logout page.
Configuring SAML SLO for CloudShell Portal in SSL mode
If CloudShell Portal is running in SSL mode (HTTPS), you will need to perform several additional configurations to enable SLO.
To configure SAML SLO to work in HTTPS:
-
In your identity provider, update all SLO logout URLs to be in https mode. For example: "
https://192.168.30.27/AuthServices/Acs". -
In the
Kentor.configfile, in the<kentor.authservicessection, update theentityIdandreturnUrlURLs to be in https mode. For example:
-
Restart the CloudShell Portal web site in IIS Manager.
If you get a "Keyset does not exist" error message, it means that your IIS user is unable to access the private key. Grant the user read access and try again.
-
Open the
C:\Program Files (x86)\QualiSystems\CloudShell\Portal\customer.configfile and set theCustomAbsoluteLoginPageandCustomAbsoluteLogoutPageto be in https mode. For example:
-
In the
web.configfile, remove therequireSslkey or change its value to "true", since the default is to use SSL cookies: