Run App Commands
These commands are available for VMs deployed by CloudShell (Apps) and for static VM resources that were added to the CloudShell inventory.
You start by deploying the App. This can be done manually as explained below or automatically via the out-of-the-box Default Sandbox Setup script, deploys all Apps in the sandbox as part of the Setup process. Once the App is deployed, additional automation commands are provided by the App's shell - see the App Resource step in Adding App templates.
Note: Some commands, like Refresh IP, do not apply to static VMs.
To run an App command:
-
In a sandbox diagram, select the required App.
-
Hover over the App. From the context menu, select Commands.
The Application Commands pane is displayed, listing the commands available for this App.
-
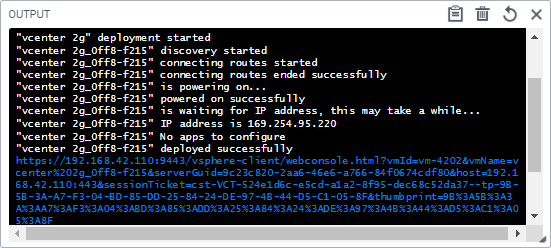
Click the Deploy command.

The App deploys the VM and installs the specified application in it. When App deployment completes, an "active" live status icon (
 ) is displayed on the App and additional commands become available.note
For vCenter Apps, the VM is deployed under the vCenter folder defined in the App's vCenter cloud provider resource, under the
Deployed Appsfolder, in a dedicated folder named as the sandbox ID.infoIf App deployment fails, an "error" live status icon is displayed on the App. Hover over the icon to see the error's description.

The following Day 2 commands are provided by default for deployed Apps:
| Command | Deployed App | Description |
|---|---|---|
| Console | OpenStack 2G | Prints the OpenStack console URL to the sandbox's Output console. Use this URL to view the instance OS. To open the instance's OpenStack console:
|
| Customize Guest OS | VMware vCenter 2G | Runs vCenter's Run Guest OS command on the VM before the VM powers on. This is a hidden command that needs to be executed using the CloudShell Automation API, as part of the sandbox's setup orchestration for example. Example scenarios include:
For details, see Customize Guest OS vCenter Command Implementation. |
| Get Snapshots | VMware vCenter | Displays a list of the App's snapshots. To see the list, click the command execution’s Show command output button.
|
| Get VM Web Console | VMware vCenter 2G | Open the VM’s web console directly from the deployed App. This can be done with or without QualiX (by specifying the credentials of a vCenter user that has at least the Virtual Machine console user role). For details on configuring QualiX support, see Configure VM Web Console Access to vCenter App VMs (QualiX). To open the VM's web console:
|
| Power Off | All | Shuts down the App's virtual machine but does not remove it from the sandbox. Notes
|
| Power On | All | Deploys the App (deploys the virtual machine and installs the specified application). Once deployed, the App changes to a resource modeled after the Shell specified for the App, and receives the IP address of the deployed virtual machine. Note that this command is not available for Azure deployed Apps that were deployed in another sandbox. Power On is only available in the "master" sandbox. |
| Reconfigure VM | VMware vCenter 2G Microsoft Azure 2G | Allows scaling up/down the VM's technical specifications. To reconfigure:
|
| Refresh IP | All | Releases and renews the VM's IP address to troubleshoot network connection issues. |
| Remove Snapshot | VMware vCenter 2G | Removes a snapshot from the App's VM. Optionally set the remove_child parameter to Yes to remove all child snapshots under the snapshot to be deleted. |
| Rerun Configuration Management | All | Re-executes the App's configuration management. The App's configuration management inputs are presented as command inputs with the values that were set before the App's deployment. You can change the values before running the command. Notes
|
| Restore Snapshot | VMware vCenter | Reverts the App's VM to a previously saved snapshot. |
| Save Snapshot | VMware vCenter | Creates a snapshot of the App's VM, saving the state of the VM's hard disc, including software and configurations. To also save the VM's RAM memory, including open windows and running processes, set Save Memory to Yes. Snapshots are available for use on the deployed App in the same sandbox only. |
| Save to Template | VMware vCenter | Update the App template with the current settings of the App. Set Save Memory to Yes if you wish to include the App's current state in the snapshot. |