Shells that Load a Static VM
In this article, we will learn how to customize a shell template to load a static VM into CloudShell. A static VM is a VM whose lifecycle is not managed through CloudShell sandboxes. For example, a VM that provides critical services or data, like a database, switch or bridge. For additional information, see Static VMs Overview.
Static VMs are viewed as resources by CloudShell. The only difference between a static VM resource and a regular resource is that the static VM needs to find the VM in the cloud provider and create a link between the CloudShell resource and the cloud provider resource, thus giving it the cloud provider shell’s capabilities. This is done by modifying the shell’s get_inventory command to load the VM’s details into CloudShell, using a CloudShell cloud provider resource to access the cloud provider server.
Let’s start by creating a new shell project. Static VMs can only be modeled in shells of type ‘Application’, so we’ll use the deployed_app shell template. In command-line, navigate to the folder in which you want to create the shell project and run the following command:
shellfoundry new my-static-vm --template gen2/deployed-app
In the shell’s driver, we’ll need to import the ApiVMDetails class and the jsonpickle package:
from cloudshell.shell.core.driver_context import ApiVmDetails, ApiVmCustomParam
import jsonpickle
You can remove ApiVmCustomParam from the import if you don’t plan on setting custom parameters directly in the driver.
Note that ApiVMDetails is included in the cloudshell-shell-core package version 3.1.x and jsonpickle is not included in the Python standard library, so we’ll need to add them both to the requirement.txt file as well:
cloudshell-shell-core>=3.1.0,<3.2.0
jsonpickle==1.1.0
As we said before, to load a static VM, the shell needs to return the ApiVmDetails in the get_inventory command’s response. Here’s an example implementation for loading a vCenter VM as a static VM:
def get_inventory(self, context):
    """
    Will locate vm in vcenter and fill its uuid
    :type context: cloudshell.shell.core.context.ResourceCommandContext
    """
    # get stuff from my cloud provider
    # ...
    uuid = '42415d31-bc19-d317-2319-b52s55e8b542' # unique identifier of the VM
    my_clp_name = 'vCenter resource' # cloudshell cloud provider resource name

    vm_details = ApiVmDetails()

    vm_details.UID = uuid
    vm_details.CloudProviderName = my_clp_name

    param1 = ApiVmCustomParam() # remove the "param1" lines if no custom params
    param1.Name = 'param1'
    param1.Value = 'value1'
    vm_details.VmCustomParams = [param1]
    str_vm_details = jsonpickle.encode(vm_details, unpicklable=False)

    # return vm_details
    autoload_atts = [AutoLoadAttribute('', 'VmDetails', str_vm_details)]
    return AutoLoadDetails([], autoload_atts)
Make sure you pass the right details to the get_inventory command. Generally speaking, these are the CloudShell cloud provider resource (my_clp_name variable) that will run the process and the VM’s identification details (uuid variable in our case). Note that for other cloud providers, different details may need to be passed in order to uniquely identify the VM. For example, a similar implementation for Azure might need the VM name and the resource group name.
Install the shell on CloudShell by running the following command-line from the shell project’s root folder:
shellfoundry install
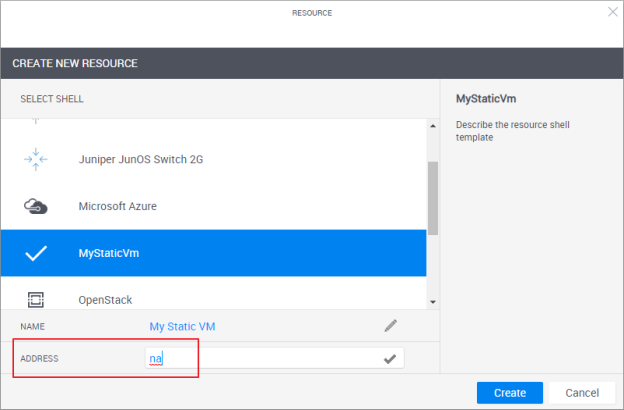
When creating the resource in CloudShell Portal’s Inventory dashboard, specify "na" as the Address if you don’t know the VM’s address or if the VM has a dynamic one:
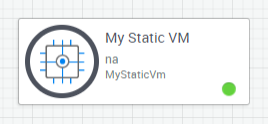
In the CloudShell sandbox, the static VM will look like any other resource, with the correct live status icon (‘online’ in this case):
Advanced: Prompting the user for inputs in the Resource Discovery page
If you want to allow the admin to provide the details during resource discovery, you will need to dynamically pull them from the context. For illustration purposes, we will set an attribute called “vCenter Name” that will define the vCenter cloud provider resource to be used to load and power on/off the VM.
First, in the shell-definition.yaml, add the attribute as a discovery attribute. For example:
node_types:

  vendor.resource.MyStaticVm:
    derived_from: cloudshell.nodes.DeployedApp
    properties:
      vCenter Name:
        type: string
        tags: [setting, configuration]
    capabilities:
      auto_discovery_capability:
        type: cloudshell.capabilities.AutoDiscovery
        properties:
          vCenter Name:
            type: string
            tags: [setting, configuration]
Now, let’s generate the shell’s data model by running the following command-line from the shell’s root folder:
shellfoundry generate
The data model file is created in the shell project’s src folder and lists the shell’s attributes and functions, including those that come with the shell’s standard and custom ones, like our vCenter Name attribute.
In the driver, replace the following line:
my_clp_name = 'my_clp_resource_name'
With this:
my_clp_name = context.resource.attributes['MyStaticVm.vCenter Name']
And install the shell on CloudShell:
shellfoundry install
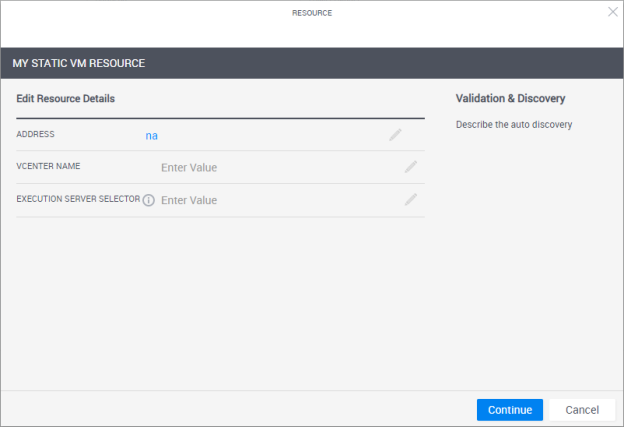
The resource’s discovery page will look something like this: