Migrating 1st Gen Shells to 2nd Gen
While CloudShell supports the use of 1st Gen shells, it is strongly recommended to switch to the new and improved 2nd Gen shells. For details, see Shells Overview.
There are two ways to migrate a 1st Gen shell to a 2nd Gen shell:
-
Replacing the 1st Gen shell with a 2nd Gen version: Applies to scenarios where you have the 2nd Gen version of the shell. Note that all Quali-certified 1st Gen shells, and some Community-grade shells, have 2nd Gen versions, which are available for download from Quali's Community Integrations page.
-
Converting a custom 1st Gen shell to a 2nd Gen shell: Applies to scenarios where a 2nd Gen version is not available.
Replacing the 1st Gen shell with a 2nd Gen version
To replace a 1st Gen shell with a 2nd Gen shell:
-
Import the 2nd Gen shell into CloudShell. For details, see Importing Shells.
-
Do one of the following:
-
For resources: Create an inventory resource using the new 2nd Gen shell. For details, see Adding Inventory Resources.
-
For services: Make sure the service category, which is associated to the service, has access to the relevant domains.
-
For cloud provider shells, create the 2nd Gen cloud provider resource and set up the deployment path(s) in the relevant App templates, see Apps in Blueprints.
Important: The new deployment type will include "2G" or "2nd Gen" in the name. For example:
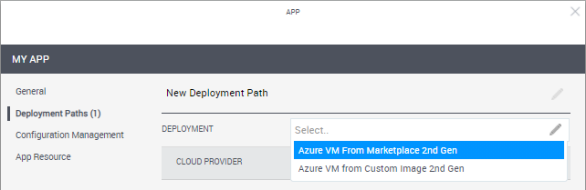
-
-
Find any blueprints that use the component to be replaced. For details on how to do this, see Finding Blueprints Containing a Specific Resource, Service or App.
-
In each relevant blueprint and blueprint template, do one of the following:
-
For resources and services: Replace all instances of the 1st Gen resource or service with the 2nd Gen version.
-
For cloud provider shells:
-
Refresh the relevant Apps to pull the 2nd Gen deployment path from the App template.
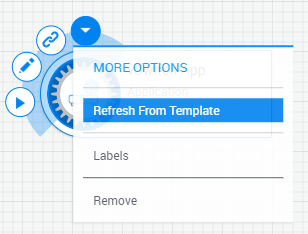
- Open the App and select the 2nd Gen deployment path.
-
-
-
Optionally delete or exclude the 1st Gen component from CloudShell.
-
To exclude a resource, in the Inventory dashboard, click the resource's more info button and select Exclude.
-
To exclude a service, either remove the service category from the service or remove the category from CloudShell.
-
For Apps, either replace the old deployment paths with the 2nd Gen ones in the App templates or remove the service categories from the App.
-
Converting a custom 1st Gen shell to a 2nd Gen shell
Prerequisites
Before we start, it is important to understand the requirements:
-
To convert a 1st Gen Shell you need access to the Shell’s source code.
-
You can only convert a Shell that implements the latest standard version.
It is highly recommended to first learn how to create and model a 2nd Gen Shell before trying to convert from 1st Gen. This is described in detail in previous chapters of this guide.
To convert a 1st Gen Shell to a 2nd Gen Shell:
-
Create a 1st Gen Shell
-
Create a 2nd Generation Shell
-
Edit the Shell’s data model
-
Convert the Driver
-
Test the conversion
Create a 1st Gen Shell
In the context of this example, we will create a 1st Gen Shell, enable AutoLoad and add additional custom functions.
To prepare the 1st Gen Shell for conversion:
-
Create a 1st Gen switch Shell by running the following command in your Command Line:
shellfoundry new my-switch --template gen1/networking/switch
				cd my-switch
This Shell implements the networking standard v 4.0.1.
-
Enable the autoload by updating the following line in the shellconfig.xml file in the datamodel folder:
<ShellsConfiguration xmlns:xsd="http://www.w3.org/2001/XMLSchema" xmlns:xsi="http://www.w3.org/2001/XMLSchema-instance" xmlns="http://schemas.qualisystems.com/ResourceManagement/ShellsConfigurationSchema.xsd"><AutoLoad Enable="true"> -
Replace the get_inventory function in the driver.py file with this sample of get_inventory:
def get_inventory(self, context): sub_resources = [ AutoLoadResource(model ='Generic Chassis',name= 'Chassis 1', relative_address='1'), AutoLoadResource(model='Generic Module',name= 'Module 1',relative_address= '1/1'), AutoLoadResource(model='Generic Port',name= 'Port 1', relative_address='1/1/1'), AutoLoadResource(model='Generic Port', name='Port 2', relative_address='1/1/2'), AutoLoadResource(model='Generic Power Port', name='Power Port', relative_address='1/PP1')] attributes = [ AutoLoadAttribute(relative_address='', attribute_name='Location', attribute_value='Santa Clara Lab'), AutoLoadAttribute('', 'Model', 'Catalyst 3850'), AutoLoadAttribute('', 'Vendor', 'Cisco'), AutoLoadAttribute('1', 'Serial Number', 'JAE053002JD'), AutoLoadAttribute('1', 'Model', 'WS-X4232-GB-RJ'), AutoLoadAttribute('1/1', 'Model', 'WS-X4233-GB-EJ'), AutoLoadAttribute('1/1', 'Serial Number', 'RVE056702UD'), AutoLoadAttribute('1/1/1', 'MAC Address', 'fe80::e10c:f055:f7f1:bb7t16'), AutoLoadAttribute('1/1/1', 'IPv4 Address', '192.168.10.7'), AutoLoadAttribute('1/1/2', 'MAC Address', 'te67::e40c:g755:f55y:gh7w36'), AutoLoadAttribute('1/1/2', 'IPv4 Address', '192.168.10.9'), AutoLoadAttribute('1/PP1', 'Model', 'WS-X4232-GB-RJ'), AutoLoadAttribute('1/PP1', 'Port Description', 'Power'), AutoLoadAttribute('1/PP1', 'Serial Number', 'RVE056702UD')] return AutoLoadDetails(sub_resources,attributes) -
Add an additional function that prints the ‘vendor’ attribute value:
def sample_command(self, context):
						"""
						Restores a saved artifact previously saved by this Shell driver using the orchestration_save function
						:param ResourceCommandContext context: The context object for the command with resource and reservation info
						"""
				return context.resource.attributes["Vendor"]
Create a 2nd Gen Shell
To convert the Shell, we will first create a new 2nd Gen Shell that implements the same standard version. Then we can edit the data model and update the driver.
To prepare the 2nd Gen Shell for conversion:
-
Create a 2nd Gen switch Shell by running the following in your Command Line:
shellfoundry new my-switch-g2 --template gen2/networking/switch
				cd my-switch-g2
It is recommended to change the name of the Shell to enable the 1st Gen Shell and the 2nd Gen Shell to work side by side on the same CloudShell database.
Edit the Shell’s data model
To edit the Shell’s data model:
-
In the shell-definition.yaml file, update the metadata section and make sure that the Shell imports the same CloudShell standard version as the 1st Gen shell.
metadata: template_name: MySwitch template_author: Anonymous template_version: 0.1.0 template_icon: shell-icon.png description: > Sample TOSCA based shell imports: - cloudshell_standard: cloudshell_networking_standard_4_0_1.yamlimports:
- cloudshell_standard: cloudshell_networking_standard_4_0_1.yaml
-
If the Shell includes custom attributes, see Modeling the Shell to learn how to model them in 2nd Gen Shell format.
-
If the Shell includes custom attributes in the discovery process, see Auto Discovery For Inventory Shells to learn how to customize the Auto-discovery process.
Convert the Driver
To convert the driver, we need to update the driver files and then update the code.
Updating the driver
To update the driver, we need to copy the 1st Gen driver into the 2nd Gen Shell project. However, since the name of the Shell may be different, we need to copy the files and keep all the references of the Shell’s name.
To update the driver:
-
In a text editor, open the 2nd Gen driver files in the src folder and save the lines that include references to the Shell’s name:
-
In the drivermetadata.xml file, copy line #1 (MainClass and Name)
<Driver Description="Describe the purpose of your CloudShell shell" MainClass="driver.MySwitchG2Driver" Name="MySwitchG2Driver" Version="1.0.0"> -
In the driver.py file, copy the class name
class MySwitchG2Driver (ResourceDriverInterface):
-
-
Replace the files in the 2nd Gen Shell’s src folder with the files from the 1st Gen Shell’s src folder.
-
To ensure that the original Shell’s name is used, open the files (drivermetadata.xml and driver.py) and replace the relevant lines with the lines we saved.
At this point, it is recommended to install the Shell and make sure that we don’t get any error message. If the installation fails, make sure that the name references match the new Shell’s name and that you copied all the driver files properly.
-
To test the modeling of the 2nd Gen Shell, run the following command in your Command Line to install the Shell:
shellfoundry install
Updating the Code – The Shell’s data model
To convert the 1st Gen Shell code to 2nd Gen, we need to modify it to match the 2nd Gen Shell’s data model.
To update the driver data model code:
-
Generate the Shell’s data model by running the following command in your Command Line:
shellfoundry generate -
Add the following to the driver.py file to import the Shell date model into the new driver:
from data_model import *The Shell’s data model should be used in all the places in the driver where we refer to an attribute by name.
For our example, replace the sample_command with the code below.
This Github Sample is by QualiSystems
2nd%20gen%20shells%20-%20migration/src/driver.py view raw
def sample_command(self, context):
				resource = MySwitchG2.create_from_context(context)
		return resource.vendor
This code converts the context object that CloudShell provides to an instance of the Shell’s data model, which is saved in the resource variable, then retrieves the value of the vendor attribute by referring to the resource.vendor property.
Updating the code – Auto-Discovery
To simplify the conversion process, CloudShell provides a special Python class that transforms 1st Gen discovery code to the 2nd Gen discovery’s structure without having to rewrite the existing code.
The class is called LegacyUtils and it is automatically generated with the Shell’s data model.
The example below shows how to use the LegacyUtils class:
This Github Sample is by QualiSystems
2nd%20gen%20shells%20-%20migration/src/driver.py view raw
def get_inventory(self, context):
				sub_resources = [ AutoLoadResource(model ='Generic Chassis',name= 'Chassis 1', relative_address='1'),
				AutoLoadResource(model='Generic Module',name= 'Module 1',relative_address= '1/1'),
				AutoLoadResource(model='Generic Port',name= 'Port 1', relative_address='1/1/1'),
				AutoLoadResource(model='Generic Port', name='Port 2', relative_address='1/1/2'),
				AutoLoadResource(model='Generic Power Port', name='Power Port', relative_address='1/PP1')]

				attributes = [ AutoLoadAttribute(relative_address='', attribute_name='Location', attribute_value='Santa Clara Lab'),
				AutoLoadAttribute('', 'Model', 'Catalyst 3850'),
				AutoLoadAttribute('', 'Vendor', 'Cisco'),
				AutoLoadAttribute('1', 'Serial Number', 'JAE053002JD'),
				AutoLoadAttribute('1', 'Model', 'WS-X4232-GB-RJ'),
				AutoLoadAttribute('1/1', 'Model', 'WS-X4233-GB-EJ'),
				AutoLoadAttribute('1/1', 'Serial Number', 'RVE056702UD'),
				AutoLoadAttribute('1/1/1', 'MAC Address', 'fe80::e10c:f055:f7f1:bb7t16'),
				AutoLoadAttribute('1/1/1', 'IPv4 Address', '192.168.10.7'),
				AutoLoadAttribute('1/1/2', 'MAC Address', 'te67::e40c:g755:f55y:gh7w36'),
				AutoLoadAttribute('1/1/2', 'IPv4 Address', '192.168.10.9'),
				AutoLoadAttribute('1/PP1', 'Model', 'WS-X4232-GB-RJ'),
				AutoLoadAttribute('1/PP1', 'Port Description', 'Power'),
				AutoLoadAttribute('1/PP1', 'Serial Number', 'RVE056702UD')]

				autoload_details = AutoLoadDetails(sub_resources,attributes)
				migrated_details = LegacyUtils().migrate_autoload_details(autoload_details, context)

		return migrated_details.create_autoload_details()
In this example, you can see that the code creates two arrays: sub_resources and attributes, which are saved in the autoload_details object. This 1st Gen structure is using explicit attribute names and model names in string format and needs to be transformed to 2nd Gen format.
With the LegacyUtils().migrate_autoload_details method, we convert the autoload_details object into a new object migrated_details. Then the function returns the new formatted structure by calling the migrated_details.create_autoload_details() object.
migrated_details = LegacyUtils().migrate_autoload_details(autoload_details, context)
		return migrated_details.create_autoload_details()
By using LegacyUtils we can avoid rewriting the get_invontory function. However, in the long term, it is recommended to refactor the code to use the Shell’s data model, as defined in Auto Discovery For Inventory Shells
Test the conversion
To test the conversion:
-
Install the Shell by running the following in Command-Line:
shellfoundry installshellfoundry install
-
Log in as administrator to CloudShell Portal, create a Shell resource. Make sure that the Auto-discovery successfully creates the resource with all of its sub-resources.
-
Add the resource to a sandbox and run the sample_command.
-
Check the Output console to see that the command successfully printed the value of the vendor attribute.