Getting Started with Orchestration Scripts
Orchestration scripts can enable automating sandbox workflows. You can use orchestration scripts to create setup and teardown procedures as well as other custom workflows that can be made available in the sandbox. Examples include saving and restoring state, starting test traffic, running failover scenarios and more. Please note that sandbox environment automation and enhanced orchestration is available with CloudShell Premium Tier.
Before developing scripts, please familiarize yourself with CloudShell by taking Quali U courses. These courses also include installation instructions for the CloudShell SDK package that deploys a developer edition of CloudShell on which you can perform your training and development activities.
Prerequisites
-
Get CloudShell: Download the latest CloudShell SDK and run it on your machine.
-
Python: Make sure the appropriate Python version - 2.7.x and/or 3.x - (latest recommended) is installed on your machine.
Starting with CloudShell 9.2, CloudShell comes with out-of-the-box support for python 3 for orchestration scripts.Python 3 automation requires Microsoft Visual C++ Redistributable 2015 x86 and x64 to be installed on the Execution Server(s).
Tip: CloudShell components such as Quali Server and the execution servers come with their own Python installation folders. Making changes to these folders may cause unexpected behavior in CloudShell. Therefore, if you plan on doing dev work on a machine that has CloudShell components installed, we recommend doing one of the following:- Configuring dedicated virtual environments for your projects out of these base installations. To do this in PyCharm, see https://www.jetbrains.com/help/pycharm/creating-virtual-environment.html. To do this via CLI, see https://docs.python-guide.org/dev/virtualenvs/#lower-level-virtualenv.
- Downloading separate installers for Python 2.7.18 and 3.9.9 and using these as global installations (by setting the installation folders in the machine’s PATH system variable) for any dev work being done.
-
IDE/Text Editor: Your preferred IDE editor. We recommend using PyCharm (which offers a free community edition) because of the tooling we’ve already created for that IDE, including a CloudShell developer plugin.
Creating and using orchestration scripts in CloudShell
This procedure shows the basic steps for creating and using orchestration scripts in CloudShell.
-
Create a Python script. You can create a single python script, or a more complex orchestration that uses dependencies, as explained in Script Deep Dive .
Tip: It is highly recommended to extend CloudShell's out-of-the-box orchestration scripts as they already contain important orchestration capabilities you'd like to preserve. To do so, log in to CloudShell Portal as Global administrator, in the Manage>Assets>Blueprint page, download the desired script, make the necessary changes and save the script under a new name.
-
If the script requires the use of Python dependencies, which aren’t available in the public PyPi repository, add them to the local PyPi Server. See Updating Python Dependencies for Shells, Drivers and Scripts.
-
Save the script (if it's a single file) or zip the package if it comprises multiple files.
Important: Make sure the script's name is not the same as any of the out-of-the-box scripts.
-
Upload the script to CloudShell. When uploading the script, you can set it as a setup or teardown script, to have it run automatically in the sandbox, or leave it as a manually launched orchestration script.
-
Attach the script to the blueprint. If it’s a setup or teardown script, remove the blueprint’s existing script first.
Creating a simple blueprint script
-
In your preferred IDE create a new Python file.
-
For now we’ll want to keep its functionality very basic. So add some Python code to print ‘Hello CloudShell’.
print 'hello CloudShell'
As a side note, in CloudShell the output of a script is displayed in the output widget in the sandbox workspace, so whatever you print in your script will find its way there.
-
Save the file and give it any name, for example ‘hello.py’.
Uploading the orchestration script to CloudShell
-
In CloudShell Portal, open the Manage dashboard.
-
In the left sidebar, click Assets and select the Blueprint option. The page should be similar to this:
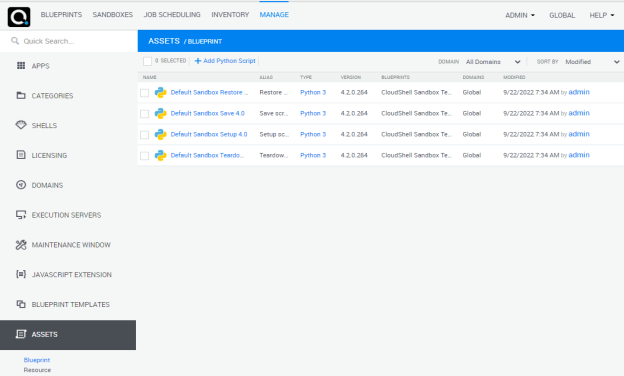
-
Click the Add Python Script button and browse for the script.
-
Once the script is uploaded, click Edit.
-
For now, just provide a name for the script (the script’s file name is the default) and select the script’s Python version.

-
And click Save to seal the deal.
Your script is now in CloudShell, all we need now is a blueprint where it can work its magic.
Attaching the script to a blueprint
-
Open the Blueprints dashboard and click Add New.
A new blueprint will be created and you’ll be taken to the blueprint’s workspace.
-
Take a second to name your blueprint. You can do that by clicking the name next to the pencil icon.
-
The last stop is the Properties page. This is where we’ll connect our new script. Click the Blueprint drop down menu and select Properties.
-
Click the Add Script button to assign our new script to the blueprint and then click Update at the bottom of the page.
That’s it! Our script is ready to be used. However, in order to run it, we’ll need to make our blueprint go live by creating a sandbox.
-
Click the Reserve button to create a sandbox from the blueprint. Next, let’s run the script.
Executing the script in the sandbox
-
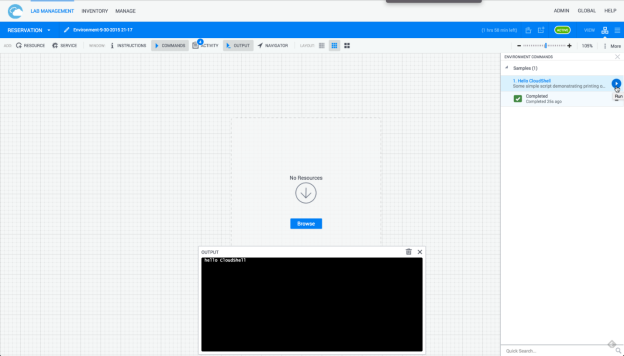
Click the Commands button on the toolbar to open the Blueprint Commands side-pane.
-
Click the Run icon next to the command to launch it!
If the command executed successfully you should see a check mark next to the command name and the Output pane will display the command output.
In the scope of this simple tutorial, we’ve seen how to link a trivial Python script with a CloudShell blueprint. We’ll look into more concrete examples and nuances in later sections of the guide.
Best Practices for working with orchestration scripts
When developing orchestration scripts, we recommend to download the latest default setup or teardown script from CloudShell Portal’s Manage>Assets page, make a copy and modify the contents. This will ensure you are using the right packages and structure.
If you wish to develop an orchestration script from scratch or develop a script for a different CloudShell version, you will need to import the cloudshell-orch-core package, which provides the basic features and capabilities needed for CloudShell orchestration scripts. Use this table to decide which version to use:
|
CloudShell version |
cloudshell-orch-core version |
|---|---|
|
8.3 GA |
>=1.7.5.0,<1.7.6.0 |
|
9.0 GA |
>=2.0.0.0,<2.1.0.0 |
|
9.1 GA |
>=2.1.0.0,<2.2.0.0 |
|
9.2 GA |
>=3.0.0.0,<3.1.0.0 |
|
9.3 GA |
>=3.2.0.0,<3.3.0.0 |
| 2020.1 | >=3.2.0.0,<3.3.0.0 |
| 2020.2 | >=3.4.0.0,<3.5.0.0 |
| 2021.1 | >=3.4.0.0,<3.5.0.0 |
| 2021.2 | >=3.4.0.0,<3.5.0.0 |
| 2022.1 | >=4.0.0.0,<4.1.0.0 |
| 2022.2 | >=4.2.0.0,<4.3.0.0 |
| 2023.1 | >=4.2.0.0,<4.3.0.0 |
| 2023.2 | >=4.3.0.0,<4.4.0.0 |
| 2023.3 | >=4.4.0.0,<4.5.0.0 |
To set a range for a package, add a line to the script's requirements.txt that states the minimum and maximum versions. For example:
cloudshell-orch-core>=3.2.0.0,<3.3.0.0To set a specific version of the package, use "==". For example:
cloudshell-orch-core==3.2.0.169For details about the requirements.txt file, see Script Deep Dive.
Setting the default Python version for new orchestration scripts
Starting with CloudShell 9.2, the DefaultPythonVersion admin key allows you to control the Python version in which all new orchestration scripts are created. For details, see Advanced CloudShell Customizations.
Note that this key also applies to new shells.
