Patch Panels
Patch panels can be used in CloudShell as a replacement or in addition to L1 switches. They can represent real physical patch panels and store the connectivity information.
A route can be requested between two devices that are connected to the same patch panel, and be activated by the user or automation. A patch panel driver will not do any active operation like an L1 driver does, but automation can refer to the connectivity information for various use cases. Such automation can, for example, send an email to the sandbox owner or to the lab admin with patching instructions.
Patch panel configuration
To create a patch panel resource, make sure to use the provided resource families (this can be imported from the system.xml or when importing any L1 configuration):
- A patch panel family (PatchPanel)
- A patch panel model (Generic PatchPanel)
- A patch panel jack family (Panel Jack)
- A patch panel jack model (Generic Jack)
- A resource structure that defines the patch panel hierarchy
To use the patch panel:
- Download the latest Additional Files zip file (from CloudShell Download Center - Earlier Releases) to a temporary location.
- Extract the zip file.
- In Resource Manager Client, open the Resource Families explorer.
- Import the system.xml file from the extracted zip folder (located in the Lab Management sub folder).
- Create a new resource using the patch panel family and model. Make sure the Patch Panel Driver is selected.
- Right-click the new resource and click Configuration from the context menu.
- The Resource Configuration page is displayed.
- Add the patch panel's ports:
- In the Internal Resources pane, right-click the patch panel resource and select New > Resource from the context menu. In the New Resource dialog box, enter the required information and click OK.
- To define which devices are connected to the patch panel ports, see Define the Resource Connections of the Switch or Patch Panel.
-
Save the changes.
The patch panel can now be used for any route request, same as L1 routes.
Patch panels in CloudShell Portal
This section applies to both patch panels and L1 switches. For brevity, the term "L1 device" is used for both.
When you reserve a blueprint that has resources with connectivity requirements, CloudShell will resolve those connections using the L1 device resource(s) you configured.
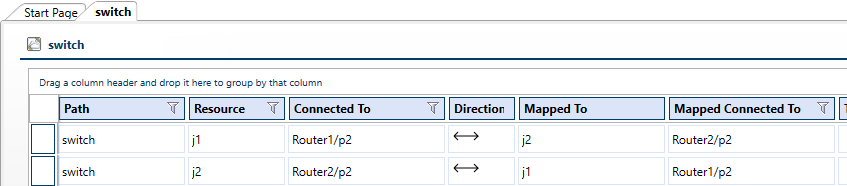
Note: You can see an L1 device's resolved connections in real time in the Resource Explorer. Right-click the L1 device resource and select Settings. In the L1 resource's Settings tab, click the Mappings button. For example, a switch that connects the "Router2" and "Router1" resources to each other:
CloudShell Portal also enables you to reserve specific blades/ports for the duration of the sandbox. You can either drag the L1 resource into the sandbox (its default is shared) and then use the Add sub resources option to add some ports to the diagram (this will allocate the ports exclusively to sandboxes based on this blueprint), or you can use the Unshare option on the L1 device resource itself to get exclusive access to the entire resource for that sandbox.
To learn how to add sub-resources and unshare a resource, see Configure Sub-resources and Share Reserved Resources.
