Managing the Shell’s Data Model
Shells often have a complex data model, which consists of multiple levels of hierarchy and many attributes. CloudShell provides a way to generate Python classes that represent the data model. These classes enable some Python IDEs (like PyCharm) to provide auto complete support to facilitate the development of the Shell’s driver.
Generating the Shell’s data model
As you know from previous chapters, the Shell’s data model consists of the standard specifications and the extended data model, which is defined in the shell-definition.yaml file. In this topic, we will explain the process of generating the data_model.py file and how to use it in your driver.
Let’s start by creating a new Switch type resource based on the Networking Shell Standard.
To generate the Shell data model:
-
Run the following command in your Command Line to create a new Shell project.
shellfoundry new generating-data-model --template=gen2/networking/switch
cd data-model-example
The Shell project includes the shell-definition.yaml file, which contains the information needed for importing the Shell’s data model according to the relevant TOSCA Shell standard.
For a detailed explanation on how to customize the Shell using TOSCA, see Modeling Shells with TOSCA.
-
Add the following example properties custom_property_1 and custom_property_2 to the
shell-definition.yamlfile:imports:
- cloudshell_standard: cloudshell_networking_standard_4_0_1.yaml
node_types:
vendor.ShellModeling:
derived_from: cloudshell.nodes.Switch
properties:
custom_property_1:
type: string
custom_property_2:
type: string -
Save the file and make sure that the YAML format is valid. You can use online tools such as yamllint to validate the format.
-
Run the following command in your Command Line to create the
data_model.pyfile:shellfoundry generateShellFoundry sends the
shell-definition.yamlfile to CloudShell and creates a new code file with the Shell’s data model -data_model.py, which is then copied into the project’s src folder.
Using the Shell data model
To use the Shell’s data model in the driver, we need to first import the data model into the driver.
To use data model in the driver:
-
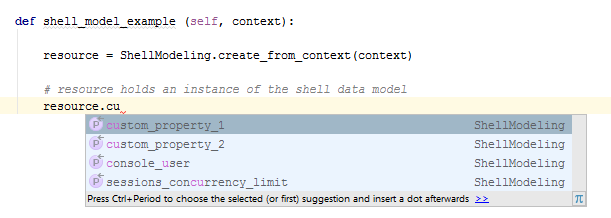
Add the following to
driver.py:from data_model import *After importing the data_model, PyCharm (and some other IDEs) will recognize the docstring code-hint annotations and will enable autocomplete as you can see below:
The
data_model.pyis mainly used to work with resource attributes and implement the Auto-discovery process.For more information see the following related topics:
Updating the Shell’s data model
After you change the Shell’s data model, by changing the custom attributes in the shell-definition.yaml file or the reference to the CloudShell standard, you need to refresh the data_model.py file.
To update the data_model.py file:
-
Run again the following command in your Command Line:
shellfoundry generate