Auto-discovery for Inventory Shells
Automated discovery makes it easy to import physical inventory devices into CloudShell by using automation to read their internal structure and attributes.
Inventory Shells in CloudShell
Shells for physical devices are defined with a certain internal structure which can be found in their CloudShell Standard. For example, a basic physical resource can have Resource Port sub-resources, whereas a Switch can have blades and port channels according to the Networking Shell Standard.
The Auto-discovery process
Auto-discovery is triggered when creating resources for Shells that support it. When the administrator creates a resource in CloudShell Portal, CloudShell prompts the administrator to fill out mandatory attributes and then launches the Auto-discovery process, querying the physical device and describing its internal structure and attributes to CloudShell.
To implement the Auto-discovery process in a Shell:
-
Optionally update Auto-discovery attributes
-
Implement the get_inventory function
-
Add validations
-
To test your code, create a resource with the template
Update Auto-discovery in the shell-definition.yaml file
The shell-definition.yaml file includes a basic Auto-discovery template.
  capabilities:
    auto_discovery_capability:
      type: cloudshell.capabilities.AutoDiscovery
      properties:
        enable_auto_discovery:
          type: boolean
          default: true
        auto_discovery_description:
          type: string
          default: <my custom discovery description>
        inventory_description:
          type: string
          default: <my custom inventory discovery description>
The Auto-discovery process is described as a TOSCA capability with the following properties. Feel free to optionally modify them.
-
enable_auto_discovery - This property defines whether the Auto-discovery process is automatically triggered when creating a new resource.
-
auto_discovery_description - This description is presented to the user before the Auto-discovery process begins.
-
inventory_description - This is the description of the Shell template. It is presented to the user when creating a new resource.
Add mandatory attributes to the Auto-discovery process
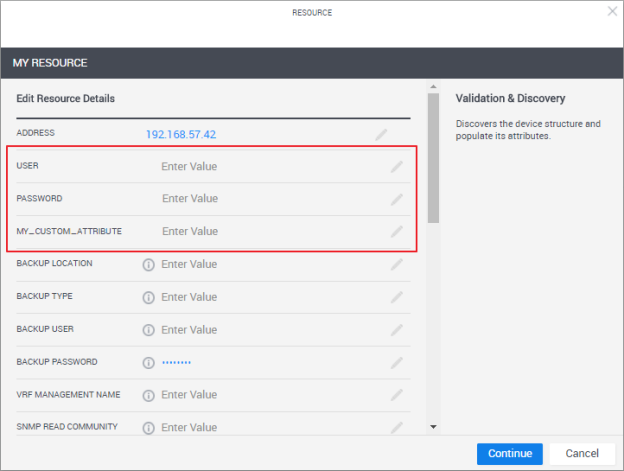
In many Auto-discovery implementations, we need to ask the administrator for information before communicating with the physical device, for example, to provide the administrator’s credentials. If we add custom attributes to the Auto-discovery definition of the Shell, CloudShell will prompt the administrator to fill out these attributes before running the discovery. This ensures that the information will be available for the discovery process to use.
In the context of this example, we’ll add 3 properties to the Auto-discovery process: User, Password and my_custom_attribute.
The User and Password attributes are defined in the standard, so we only need to add them to the auto_discovery_capability section. However, my_custom_attribute is a specific attribute that we want to add to this Shell, so we need to add the attribute to both the properties section and the auto_discovery_capability section.
vendor.ImplementingDiscovery:
  derived_from: cloudshell.nodes.Switch
  properties:
    my_custom_attribute:
      type: string          # optional values: string, integer, float, boolean, cloudshell.datatypes.Password
  capabilities:
    auto_discovery_capability:
      type: cloudshell.capabilities.AutoDiscovery
      properties:
        enable_auto_discovery:
          type: boolean
          default: true
        auto_discovery_description:
          type: string
          default: Describe the auto discovery
        inventory_description:
          type: string
          default: Describe the resource shell template
        User:
          type: string
        Password:
          type: cloudshell.datatypes.Password
        my_custom_attribute:
          type: string
For example:
Implement the get_inventory function
The goal of the get_inventory function in the Shell’s driver is to query the device and return a list of sub-resources and attribute values back to CloudShell. After querying the device, the function should return a specific result to CloudShell to allow creating the right resources. This process is called discovery in CloudShell Portal, and autoload in Resource Manager Client.
To implement the get_inventory function:
-
Run the
shellfoundry generatecommand to generate the Shell’s data model. For more information about the Shell’s data model, see Managing the Shell’s Data Model. -
Uncomment the following import in the shell's
driver.pyfile:from data_model import *
This is an example of a get_inventory implementation:
This Github Sample is by QualiSystems
2nd%20gen%20shells%20-%20implementing_discovery/src/driver.py view raw
def get_inventory(self, context):
    """
    Discovers the resource structure and attributes.
    :param AutoLoadCommandContext context: the context the command runs on
    :return Attribute and sub-resource information for the Shell resource you can return an AutoLoadDetails object
    :rtype: AutoLoadDetails
    """

    resource = ImplementingDiscovery.create_from_context(context)
    resource.vendor = 'specify the shell vendor'
    resource.model = 'specify the shell model'

    chassis1 = GenericChassis('Chassis 1')
    chassis1.model = 'WS-X4232-GB-RJ'
    chassis1.serial_number = 'JAE053002JD'
    resource.add_sub_resource('1', chassis1)

    module1 = GenericModule('Module 1')
    module1.model = 'WS-X5561-GB-AB'
    module1.serial_number = 'TGA053972JD'
    chassis1.add_sub_resource('1', module1)

    port1 = GenericPort('Port 1')
    port1.mac_address = 'fe80::e10c:f055:f7f1:bb7t16'
    port1.ipv4_address = '192.168.10.7'
    module1.add_sub_resource('1', port1)

    return resource.create_autoload_details()
This get_inventory code creates an instance of the root resource by calling the create_from_context function. In this particular example, we’re autoloading the root’s sub-resources and their attributes, and populating the Vendor and Model attribute values on the root resource.
Note that get_inventory only creates the sub-resources and configures their attributes as the root resource already exists at this stage. Autoload can also update the attribute values on the root level.
This sample creates GenericChassis, GenericModule and GenericPort resource models and uses the add_sub_resource function to build the resource hierarchy.
To create the port:
-
Create a new GenericPort instance.
-
Provide a unique name for the port.
-
Add it as a sub resource of a specific module: a. Call the add_sub_resource function on the module. b. Provide both the relative_address of the port and the instance that represents the port.
To return the information back to CloudShell, we need to use a specific data structure that represents the result of the discovery. The data structure is created automatically by calling the create_autoload_details() function.
Add validations
A common enhancement for discovery functions that greatly improves the usability of the Auto-discovery process is to validate the information provided by the administrator. For example, trying to log in with the address and credentials and reporting back any error, or checking the text for illegal characters.
Any exceptions raised in the get_inventory flow will display an error message to help the administrator correct their input and try again
Create a resource with the template
To test the code, let’s create a resource based on the Shell template.
To create a resource with the template:
-
Import the Shell template using ShellFoundry.
-
Open CloudShell Portal’s Inventory dashboard and click the Add New button. A dialog box is displayed, prompting you to select the template and enter a resource name.
-
Select the ImplementingDiscovery template, enter a name for the resource, and click Create.
The Resource dialog box is displayed.
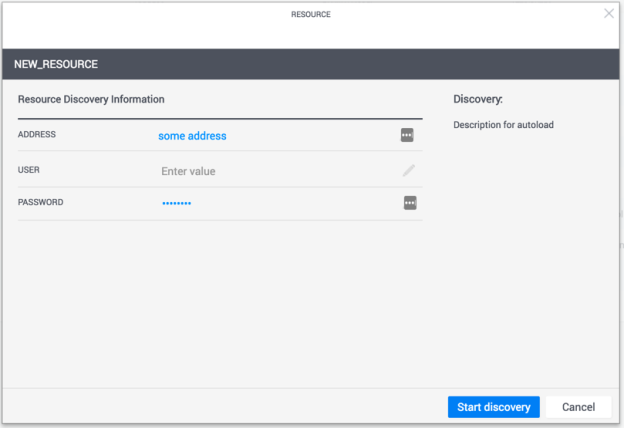
-
Enter the Username and Password and click Start discovery. The get_inventory function creates the entire device structure and a system message pops up to indicate the discovery process completed successfully.
-
To validate, enter the name of the new resource in the Inventory search field. You should see a list of sub-resources with the discovered attributes:
