Driver Deep Dive
In this section we’ll take a look at some of the design principles and mechanics of Shell drivers. To get started, we should first create a Shell project to experiment with. Once again we’ll use Shellfoundry.
shellfoundry new driver-example --template=gen2/resource
cd driver_example
The driver structure
The src folder in the Shell project is the driver source code root. On some IDEs you need to set that manually when opening the Shell project.
Every Shell driver is required to have one main driver class. This class represents the main driver interface and is the file CloudShell introspects to get and validate the list of commands for the Shell. Every Shellfoundry template will generate the driver main file in the driver.py file and a main driver class with the name [ShellName]Driver, both of which are the convention.
Any public function added to this driver will be considered a Shell command. Any private function (prefixed by Python convention by an underscore) added to the main class will be considered an internal helper function and will be ignored by CloudShell. We can refer to these public functions in the driver class as CloudShell command functions. Each command function can also have a special parameter called context. This parameter will be provided by CloudShell as an object containing information about the sandbox and resource/app the device is executing against. Another special property of the context parameter is that its completely invisible to users or API clients executing the command. If you execute the command from the UI or API you will never see a context parameter. The context object is reviewed in How Shells Get Information from CloudShell.
The drivermetadata.xml file, also located in the src directory provides additional information on the driver functions and how CloudShell should expose and display them as CloudShell Commands. More information about this file and how to customize CloudShell commands can be found in Commands Visibility and Usability.
The driver can contain additional files and folders which you can reference in your driver class. In order to reference a file in a nested folder you need to add an __init__.py file according to Python convention so that the folder is considered a package with its own namespace.
Referencing other packages
A driver can also have a requirements.txt file to declare any dependencies on external packages just like any Python package. When CloudShell creates a virtual environment to run the driver, it will use pip to pull those requirements and prepare the environment.
The requirements.txt file follows the normal pip rules and file format.
The requirements are pulled each time a driver virtual environment is created, it is recommended to either pin the external package version in the requirements.txt file, or at least use semantic versioning convention to limit the automatic updates to patch releases only. If you link to an external package by name only and without any version constraints and a new version of the package with breaking changes is released, the driver code may break as well. All Quali released drivers either pin the dependency version or specify a range allowing patch version updated only. For example, if you look at the generated requirements.txtfile for our project:
cloudshell-shell-core>=2.0.0,<2.1.0According to this constraint, pip will not automatically install any minor version beyond 2.0 but patch versions are allowed.
It is also possible to change the validity period for virtual environments. This period determines if the Execution Servers will update the venv's dependencies on subsequent executions of the venv's driver or script. For details, see Setting the Virtual Environment validity period.
Returning Results
Any result returned by the Python driver command function will be considered the command result by CloudShell. String will be returned as is, if you return an object CloudShell will try to convert it into a string JSON. It’s not advisable to return complex objects that cannot be serialized such as sessions or connections as that would most likely result in an error. Please check out our short instructional video on how to develop basic driver commands at the end of this section.
To demonstrate this, let’s add a couple of functions to the driver:
This Github Sample is by QualiSystems
adding_examples/driver_deep_dive/src/driver.py view raw
def return_simple_string(self, context):
"""
A simple example function returning a string
:param ResourceCommandContext context: the context the command runs on
"""
return "Some string return value"
def return_complex_object(self, context):
"""
A simple example function returning a string
:param ResourceCommandContext context: the context the command runs on
"""
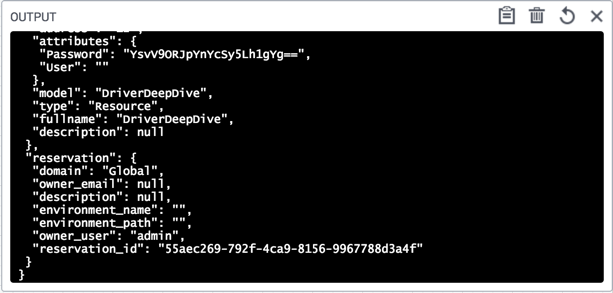
return contextIn the first example, we just return a line of string. In the second example, we actually return the context object that is being passed to the driver.
After adding the functions reinstall the Shell using Shellfoundry and run the new commands:
Returning a result has several effects:
-
The result will appear in the environment output and be linked from the commands panel, unless the command was executed via an API method that includes the PrintOutput=False tag. For example:
sandbox.automation_api.ExecuteCommand(sandbox.id, 'my switch', 'Resource', 'run_traffic', printOutput=False) -
If another command or an orchestration script called this command, it will receive back the result.
-
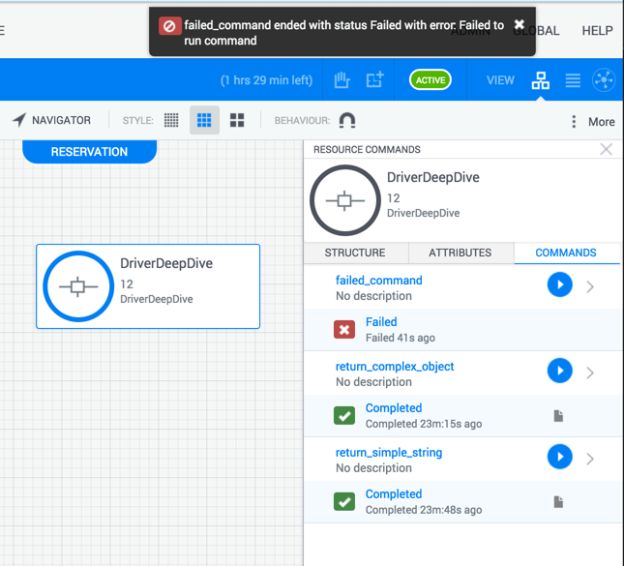
The command will appear as having completed successfully in the commands panel:
Handling failure
If the command failed you can throw an exception as you would in any Python code. The exception will be parsed and the message property of the exception will be shown to the user.
This Github Sample is by QualiSystems
adding_examples/driver_deep_dive/src/driver.py view raw
def failed_command(self, context):
    """
    A simple example function returning a string
    :param ResourceCommandContext context: the context the command runs on
    """
    raise Exception("Failed to run command")
If the command is being called from an orchestration script or a different Python driver, calling a command that fails in this way will result in an exception of type CloudShellAPIError. The error message will include the type of exception (the original exception raised in the code) as well as the error message.

Cancellation and termination
In CloudShell, cancellation and termination are treated very differently.
-
Termination is a brute force action that will terminate the driver execution. It is intended to deal with hanging or stuck drivers. The danger with termination is that if used lightly it may cause the driver process to be killed in the middle of a critical process, leaving the device/driver in an unexpected or unsupported state. Because termination is a last resort unsafe action, CloudShell restricts the permissions for this action and only domain and system admins can terminate a command. Because it can have unwanted side effects, the termination button has an exclamation mark next to it and you’ll need to confirm the action.
-
Cancellation is only available for driver commands implementing this capability. Cancelling a command signals it to complete and gives it a chance to abort or rollback gracefully. Drivers should implement cancellation for commands that can take up a long period of time.
To implement cancellation for a driver command, you first need to add a parameter to the Python function, which like the context object will be passed in automatically by CloudShell. Adding the extra parameter, called cancellation_context will signal to CloudShell that the command supports cancellation and the user will be able to attempt to stop it while it is running. Next, add an entry for the command in the drivermetadata.xml file and add the attribute: EnableCancellation=”true”
This Github Sample is by QualiSystems
adding_examples/driver_deep_dive/src/drivermetadata.xml view raw
<Driver Description="Describe the purpose of your CloudShell shell" MainClass="driver.DriverDeepDiveDriver" Name="DriverDeepDiveDriver" Version="1.0.0">
    <Layout>
            <Command Description=""  EnableCancellation="true" Name="cancellable_command" />
    </Layout>
</Driver>
Copy the following function to the driver to add a cancellable command:
This Github Sample is by QualiSystems
adding_examples/driver_deep_dive/src/driver.py view raw
def cancellable_command(self, context, cancellation_context):
    """
    A simple example function returning a string
    :param ResourceCommandContext context: the context the command runs on
    :param CancellationContext cancellation_context: an object used to signal a request to cancel the operation
    """
    counter = 0
    while counter < 1000 and not cancellation_context.is_cancelled:
        counter += 1
        sleep(1)
Re-install the shell. You’ll now see the commands pane has a regular stop button (without an exclamation mark). If you click the stop button the is_cancelled property on the cancellation_context object will be updated and the driver will get a chance to complete its current actions and end its execution.
Drivers and concurrency
CloudShell supports two modes for drivers:
-
A serial mode - default - of execution in which for each app/resource driver instance CloudShell will send one command at a time. With this mode, you can be sure that when a command is executed no other command will run in parallel with that same resource/app and using that driver instance object.
-
Concurrent execution - with this mode enabled, it will be up to the driver to handle any synchronization between parallel threads if needed. CloudShell will send commands to the driver in parallel.
The driver concurrency mode is defined in the shell-definition.yaml file.
To support concurrency:
Open the shell-definition.yaml and add the concurrent_execution capability.
capabilities:
  concurrent_execution:
    type: cloudshell.capabilities.SupportConcurrentCommands
Sequential execution is the default mode mainly because it simplifies the driver. If the driver doesn’t have to worry about other things happening in parallel it can avoid adding mutex expressions or manage critical sections in the code.
You should decide whether to enable concurrent execution by balancing the usage requirements for the driver and the complexity of supporting concurrency.
-
Driver usage: Sometimes the driver commands not called very often so it is likely that staying with sequential execution will not affect the user experience or increate wait times. This is especially true if the Shell resource is used exclusively within each sandbox. In such a scenario, it is being used by a single user at a time which may not require parallelism.
-
Complexity of supporting concurrency: Supporting concurrent executions can be more complex if the driver is not stateless or if the API or CLI the driver is communicating with does not itself support concurrency well or is limited to a specific number of sessions. In those situations there will be additional cost in terms of driver complexity to support concurrent execution.
Using the CloudShell API
In general, it is recommended to use the CloudShell API as little as possible from the driver, which is supposed to mostly communicate with the app or device. However, there are several common use cases where drivers would use the API to update CloudShell regarding the status of the resource or write additional messages to the console. Please check out our short instructional video on how to develop API commands at the end of this section.
Starting a CloudShell API session requires information regarding the sandbox reservation and the server connectivity information. All of that information is available in the context parameter of the command function that is being passed by CloudShell. For more information about that object and the information it provides please see the How Shells Get Information from CloudShell section.
First, as we’ll need the CloudShell API, we should add it to the requirements.txt file. Open the requirements.txt file and add the following line:
cloudshell-automation-api>=9.0.0.0,<9.1.0.0You should constrain the cloudshell-automation-api package based on the version of CloudShell you’re currently using. This specific package version will always be prefixed by the relevant CloudShell version it supports. This means that if you’re using 9.2, for example, the above line should read:
cloudshell-automation-api>=9.2.0.0,<9.3.0.0To start a CloudShell API session, first import the CloudShellAPISession module, then initialize an object with the connectivity parameters. Import the CloudShellAPISession module by adding the following statement to the beginning of the driver.py file:
from cloudshell.api.cloudshell_api import CloudShellAPISessionTo log in we don’t need a username/password, since we get an AdminAuthToken we can use with the context object. Copy and paste the following function:
This Github Sample is by QualiSystems
driver_deep_dive/src/driver.py view raw
def use_cloudshell_api_session(self, context):
    """
    A simple example function returning a string
    :param ResourceCommandContext context: the context the command runs on
    """
    session = CloudShellAPISession(host=context.connectivity.server_address, token_id=context.connectivity.admin_auth_token,
domain=context.reservation.domain)Tip: The AdminAuthToken can be used to log on to Cloudshell Automation API, (or to Sandbox Api). However, the lifetime of AdminAuthToken is only for the duration of the command. Once the command has ended, API sessions initialized with the AdminAuthToken will no longer be valid and will throw API error 118. For this reason, it is important not to try to persist the AdminAuthToken or API sessions based on the AdminAuthToken in one command, and try to use it in another driver command, because the token will no longer be valid.
This is pretty straightforward but can also probably get repetitive. The helper classes that are provided with the cloudshell_shell_core package are intended to help you get rid of some of that boilerplate. The CloudShellSessionContext allows easily creating a session from a context object. To use the helper first import the module by adding this to the driver.py imports:
from cloudshell.shell.core.session.cloudshell_session import CloudShellSessionContextThen, paste the following function:
This Github Sample is by QualiSystems
driver_deep_dive/src/driver.py view raw
def use_cloudshell_api_session_with_helpers(self, context):
    """
    A simple example function returning a string
    :param ResourceCommandContext context: the context the command runs on
    """

    with CloudShellSessionContext(context) as session:
        session.WriteMessageToReservationOutput(context.reservation.reservation_id, "Hello from Shell")
Now that we have a CloudShell API session, there are three main things we may want to do with it from our driver: Decrypt a password attribute, update the resource live status or update the console widget with progress report. You can find the code for these operations in Common Driver Recipes.
